Developer Guide
Table of Contents
- Table of Contents
- Acknowledgements
- Setting up, getting started
- Design
- Implementation
- Documentation, logging, testing, configuration, dev-ops
- Appendix: Requirements
- Appendix: Instructions for Manual Testing
- Appendix: Effort
- Appendix: Planned Enhancements
Acknowledgements
- Reused code from ToothTracker for table of contents, sticky navigation and auto-numbering of headers for website
Setting up, getting started
Refer to the guide Setting up and getting started.
Design
Architecture
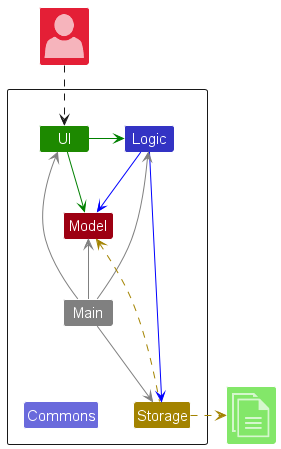
The Architecture Diagram given above explains the high-level design of the App.
Given below is a quick overview of main components and how they interact with each other.
Main components of the architecture
Main (consisting of classes Main and MainApp) is in charge of the app launch and shut down.
- At app launch, it initializes the other components in the correct sequence, and connects them up with each other.
- At shut down, it shuts down the other components and invokes cleanup methods where necessary.
The bulk of the app’s work is done by the following four components:
-
UI: The UI of the App. -
Logic: The command executor. -
Model: Holds the data of the App in memory. -
Storage: Reads data from, and writes data to, the hard disk.
commons represents a collection of classes used by multiple other components.
How the architecture components interact with each other
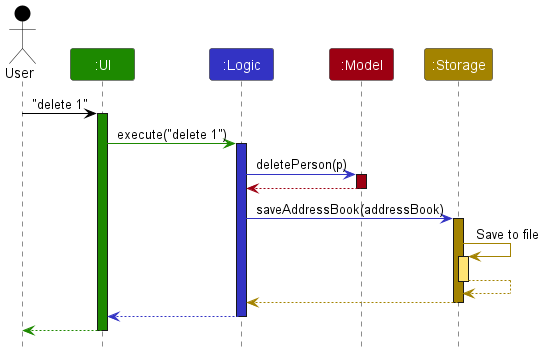
The Sequence Diagram below shows how the components interact with each other for the scenario where the user issues the command delete 1.
Each of the four main components (also shown in the diagram above),
- defines its API in an
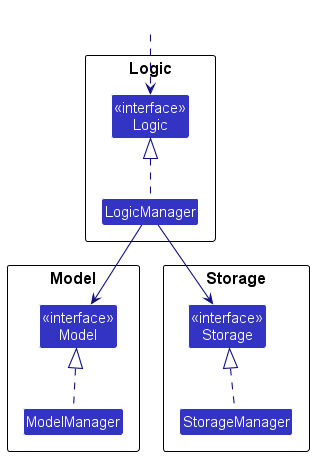
interfacewith the same name as the Component. - implements its functionality using a concrete
{Component Name}Managerclass (which follows the corresponding APIinterfacementioned in the previous point.
For example, the Logic component defines its API in the Logic.java interface and implements its functionality using the LogicManager.java class which follows the Logic interface. Other components interact with a given component through its interface rather than the concrete class (reason: to prevent outside component’s being coupled to the implementation of a component), as illustrated in the (partial) class diagram below.
The sections below give more details of each component.
UI component
The API of this component is specified in Ui.java
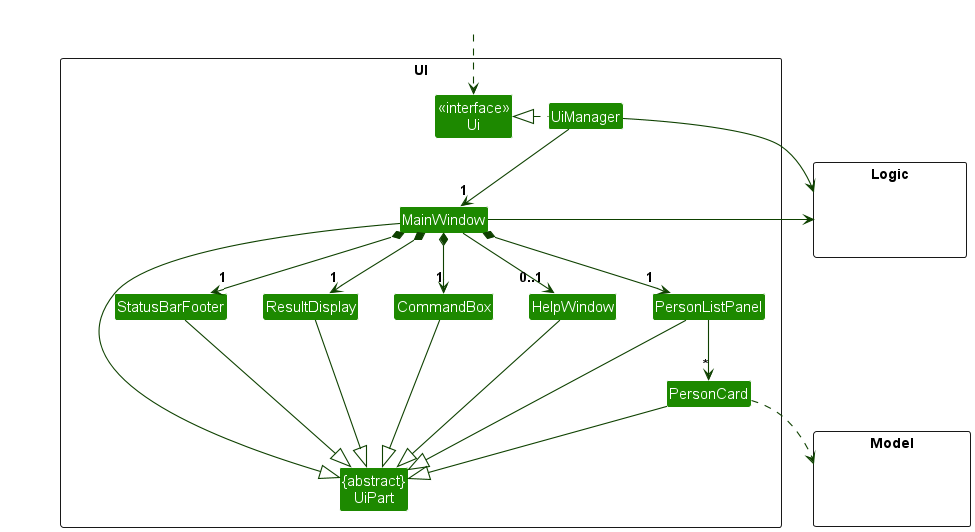
The UI consists of a MainWindow that is made up of parts e.g.CommandBox, ResultDisplay, PersonListPanel, StatusBarFooter etc. All these, including the MainWindow, inherit from the abstract UiPart class which captures the commonalities between classes that represent parts of the visible GUI.
The UI component uses the JavaFx UI framework. The layout of these UI parts are defined in matching .fxml files that are in the src/main/resources/view folder. For example, the layout of the MainWindow is specified in MainWindow.fxml
The UI component,
- executes user commands using the
Logiccomponent. - listens for changes to
Modeldata so that the UI can be updated with the modified data. - keeps a reference to the
Logiccomponent, because theUIrelies on theLogicto execute commands. - depends on some classes in the
Modelcomponent, as it displaysPersonobject residing in theModel.
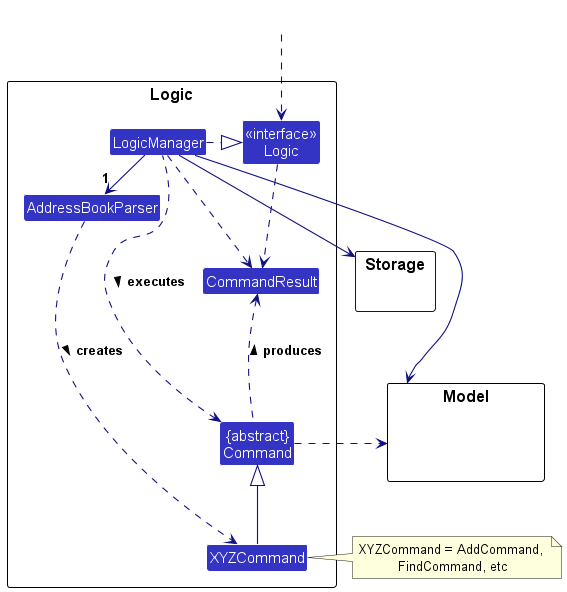
Logic component
API : Logic.java
Here’s a (partial) class diagram of the Logic component:
The sequence diagram below illustrates the interactions within the Logic component, taking execute("delete 1") API call as an example.
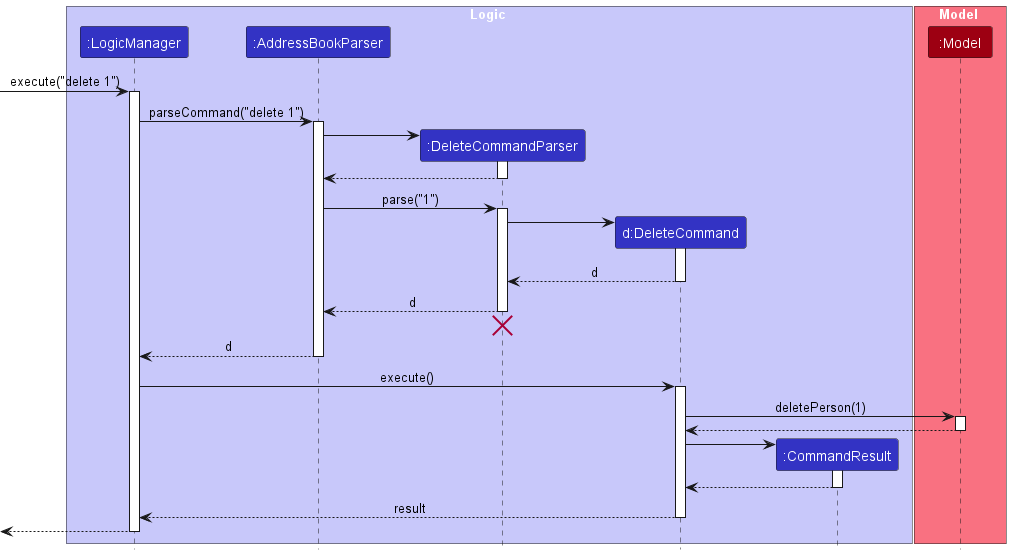
DeleteCommandParser should end at the destroy marker (X) but due to a limitation of PlantUML, the lifeline reaches the end of diagram.
How the Logic component works:
- When
Logicis called upon to execute a command, it is passed to anAddressBookParserobject which in turn creates a parser that matches the command (e.g.,DeleteCommandParser) and uses it to parse the command. - This results in a
Commandobject (more precisely, an object of one of its subclasses e.g.,DeleteCommand) which is executed by theLogicManager. - The command can communicate with the
Modelwhen it is executed (e.g. to delete a person). - The result of the command execution is encapsulated as a
CommandResultobject which is returned back fromLogic.
Here are the other classes in Logic (omitted from the class diagram above) that are used for parsing a user command:
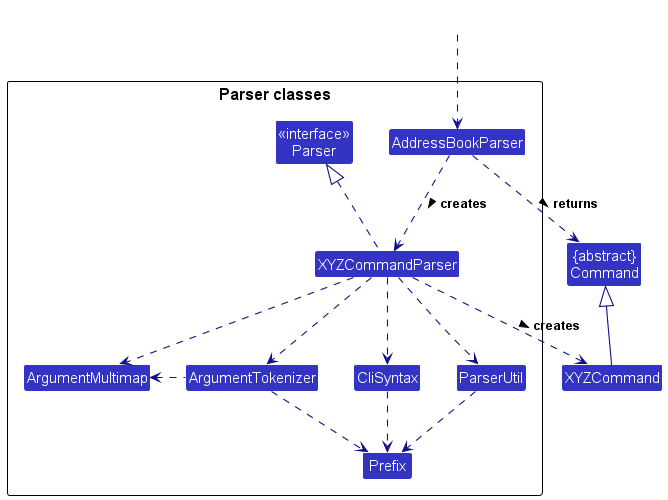
How the parsing works:
- When called upon to parse a user command, the
AddressBookParserclass creates anXYZCommandParser(XYZis a placeholder for the specific command name e.g.,AddCommandParser) which uses the other classes shown above to parse the user command and create aXYZCommandobject (e.g.,AddCommand) which theAddressBookParserreturns back as aCommandobject. - All
XYZCommandParserclasses (e.g.,AddCommandParser,DeleteCommandParser, …) inherit from theParserinterface so that they can be treated similarly where possible e.g, during testing.
Model component
API : Model.java
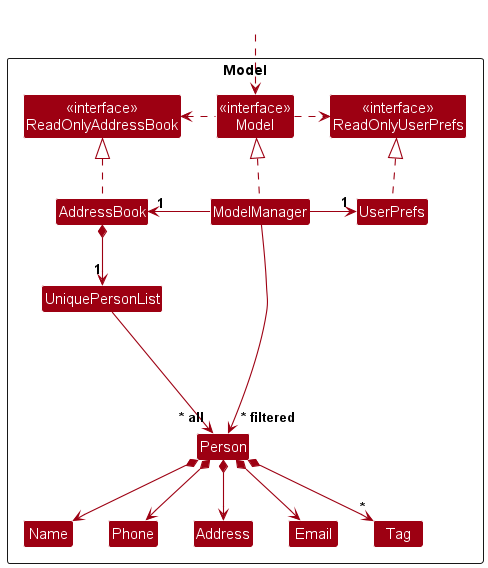
The Model component,
- stores the address book data i.e., all
Personobjects (which are contained in aUniquePersonListobject). - stores the currently ‘selected’
Personobjects (e.g., results of a search query) as a separate filtered list which is exposed to outsiders as an unmodifiableObservableList<Person>that can be ‘observed’ e.g. the UI can be bound to this list so that the UI automatically updates when the data in the list change. - stores a
UserPrefobject that represents the user’s preferences. This is exposed to the outside as aReadOnlyUserPrefobjects. - does not depend on any of the other three components (as the
Modelrepresents data entities of the domain, they should make sense on their own without depending on other components)
Tag list in the AddressBook, which Person references. This allows AddressBook to only require one Tag object per unique tag, instead of each Person needing their own Tag objects.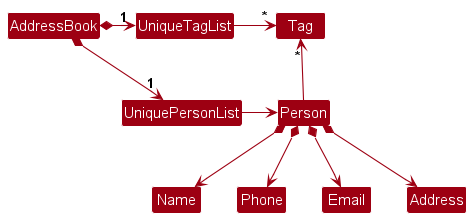
Storage component
API : Storage.java
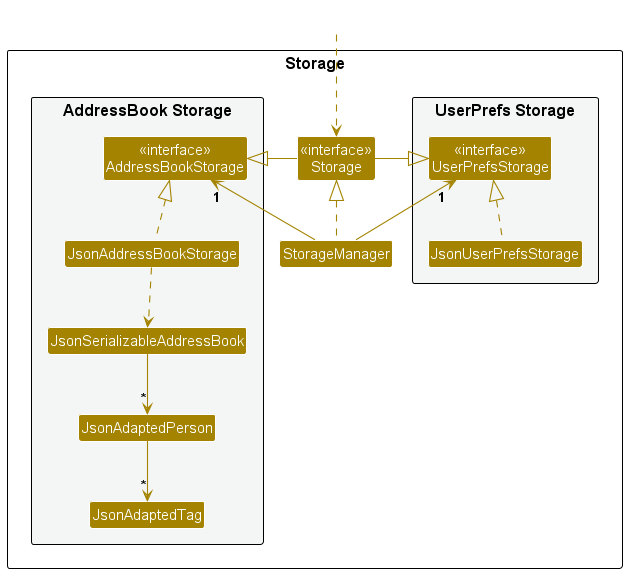
The Storage component,
- can save both address book data and user preference data in JSON format, and read them back into corresponding objects.
- inherits from both
AddressBookStorageandUserPrefStorage, which means it can be treated as either one (if only the functionality of only one is needed). - depends on some classes in the
Modelcomponent (because theStoragecomponent’s job is to save/retrieve objects that belong to theModel)
Common classes
Classes used by multiple components are in the seedu.addressbook.commons package.
Implementation
This section describes some noteworthy details on how certain features are implemented.
Hide/unhide feature
The hide/unhide mechanism introduces the capability to selectively hide certain applicants from view, improving user experience and providing greater control over the displayed information. This also includes a way to view all hidden applicants in a list.
Implementation
This feature implements the following operations:
-
HideCommand#execute()— Hides the specified applicant from the list. -
UnhideCommand#execute()— Unhides the specified applicant from the list. -
UnhideAllCommand#execute()— Unhides all hidden applicants. -
ListHiddenCommand#execute()— Displays a list of all hidden applicants.
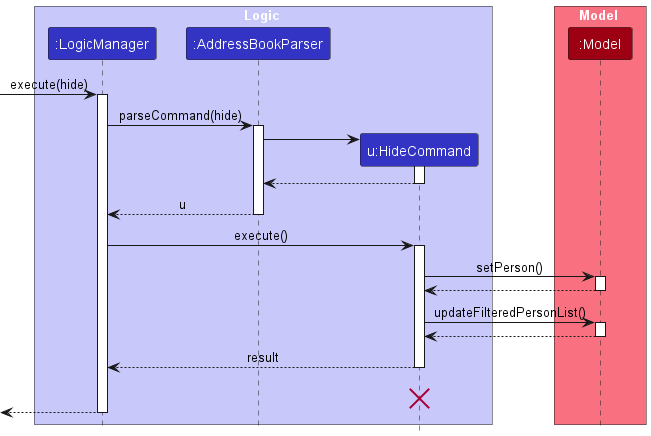
Given below is an example usage scenario and how the hide/unhide mechanism behaves at each step.
Step 1. The user launches the application for the first time. The applicant list displays all applicants without any hidden applicants.
Step 2. The user decides to hide the 3rd applicant in the applicant list by executing hide 3. The hide command calls Model#setPerson() to replace the applicant with a hidden version. Model#updateFilteredPersonList() to update the list of applicants displayed in the UI to exclude the hidden applicant.
Step 3. The user executes list hidden to view all hidden applicants. The list hidden command calls Model#updateFilteredPersonList() to update the list of applicants displayed in the UI to include only hidden applicants.
Step 4. The user decides to unhide the 1st applicant in the hidden applicant list by executing unhide 1. The hide command calls Model#setPerson() to replace the hidden applicant with a non-hidden version. The unhide command calls Model#updateFilteredPersonList() to update the list of applicants displayed in the UI to include the unhidden applicant.
Step 5. Alternatively, the user can choose to unhide all hidden applicants by executing unhide all. The unhide all command creates a copy of the model and calls Model#updateFilteredPersonList() and Model#getFilteredPersonList() on that model to receive a list of hidden applicants. It then replaces every hidden person in the original model with a non-hidden version by calling Model#setPerson(). The unhide all command calls Model#updateFilteredPersonList() to update the list of applicants displayed in the UI to include all unhidden applicants.
The following sequence diagram shows how the undo operation works:
The following activity diagram summarizes what happens when a user executes a new command:

Bookmark/Unbookmark feature
The bookmark/unbookmark mechanism gives users the ability to bookmark or unbookmark certain applicants they want to take note of, as well as list these bookmarked applicants. This allows users to better differentiate between a long list of applicants, improving the ease of usage of this application and user experience.
Implementation
The bookmark/unbookmark mechanism is mainly facilitated by the BookmarkCommand/UnbookmarkCommand, BookmarkCommandParser/UnbookmarkCommandParser, and isBookmarked classes. It extends the abstract class Command with an execute functionality, to facilitate the execution of the command. Specifically, the bookmark/unbookmark feature is implemented through the following components and operations:
-
BookmarkCommand/UnbookmarkCommand— Core component responsible for executing the bookmarking/unbookmarking of a specific applicant. -
BookmarkCommandParser/UnbookmarkCommandParser— Contains the functionalities for user input parsing. It ensures that user input is valid as a bookmark/unbookmark command by meeting specific requirements. -
Person— Represents the TA applicants with their respective fields, such asisBookmarked. -
isBookmarked— Represents whether an applicant is bookmarked or not through the use of a Boolean value.
Given below is an example usage scenario and how the bookmark/unbookmark mechanism behaves at each step.
Step 0. Assume that there is an existing list of applicants in the application after launch.
Step 1. The user launches the application. Applicant list is displayed.
Step 2. The user executes bookmark 5 command to bookmark the 5th applicant in TAfinder. The BookmarkCommmandParser is invoked to parse the user’s input.
Step 3. BookmarkCommandParser will then invoke ParserUtil for parsing of the index and check for index errors. If the index is invalid, the system will generate an error message. The error message will be displayed to the user, providing clear feedback about the issue and the specific constraints that are not met.
Step 4. If the index is valid, BookmarkCommand#execute() fetches the intended applicant from the currently visible list and bookmarks the applicant with the corresponding index.
Step 5. Then, BookmarkCommand#execute() updates Model#setModel with the updated Person. Displaying the updated applicant list with a bookmark indicator.
Step 6. A success message is displayed to the user to confirm that the applicant has been bookmarked successfully.
Step 7. The user then decides to view all bookmarked applicants by executing the list-bookmarked command. The list-bookmarked command calls Model#updateFilteredPersonList(), which updates the list of applicants presented in the UI to only include bookmarked applicants.
The following sequence diagram shows how the bookmark operation works:

The following activity diagram summarizes what happens when a user executes a bookmark command:

View feature
The view mechanism gives users the ability to view a specific applicant’s details. This allows users to better focus on and evaluate a singular applicant when they need to, improving the ease of usage of this application and user experience.
Implementation
The view mechanism is mainly facilitated by the ViewCommand and ViewCommandParser classes. It extends the abstract class Command with an execute functionality, to facilitate the execution of the command. Specifically, the view feature is implemented through the following components and operations:
-
ViewCommand— Core component responsible for executing the the viewing of a singular applicant’s details from the list. -
ViewCommandParser— Contains the functionalities for user input parsing. It ensures that user input is valid as a view command by meeting specific requirements. -
Person— Represents the TA applicants with their respective fields.
Given below is an example usage scenario and how the view mechanism behaves at each step.
Step 0. Assume that there is an existing list of applicants in the application after launch.
Step 1. The user launches the application. Applicant list is displayed.
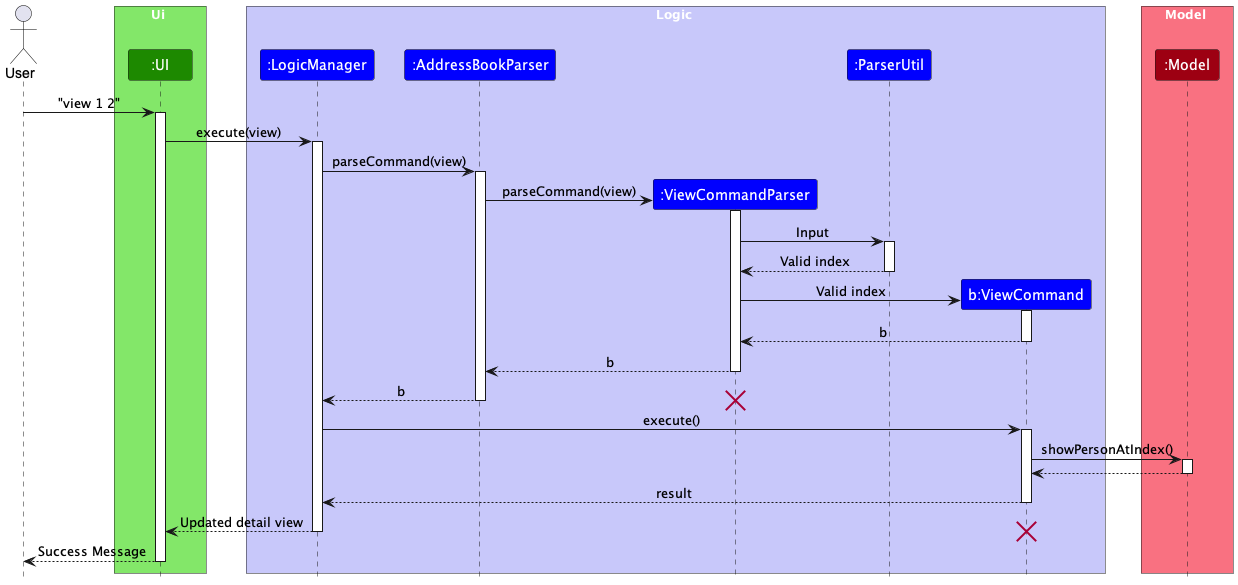
Step 2. The user executes view 5 command to view the details of the 5th applicant in TAfinder. The ViewCommmandParser is invoked to parse the user’s input.
Step 3. ViewCommandParser will then invoke ParserUtil for parsing of the index and check for index errors. If the index is invalid, the system will generate an error message. The error message will be displayed to the user, providing clear feedback about the issue and the specific constraints that are not met.
Step 4. If the index is valid, ViewCommand#execute() fetches the intended applicant.
Step 5. Then, CommentCommand#execute() calls Model#showPersonAtIndex to set Model#currentPerson with the intended applicant (in the form of a Person). PersonDetailPanel displays details of the intended applicant corresponding to the given index.
Step 6. A success message is displayed to the user to confirm that specified applicant’s details has been displayed successfully.
The following sequence diagram shows how the view operation works:
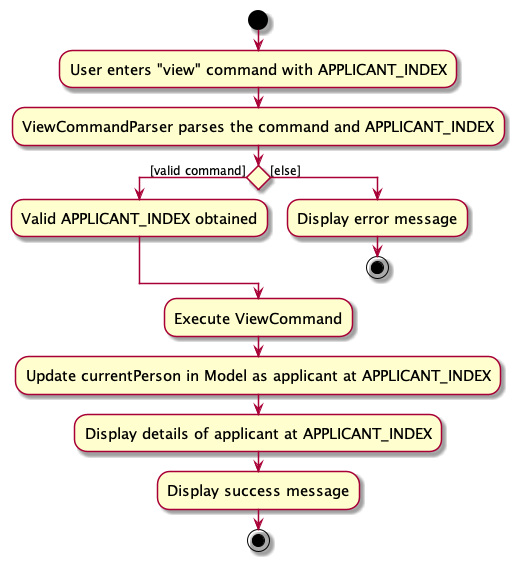
The following activity diagram summarizes what happens when a user executes a view command:
Compare feature
The compare mechanism allows users to compare two distinct TA applicants in the TAfinder app.
Implementation
The compare mechanism is mainly facilitated by the CompareCommand, CompareCommandParser, and CompareWindow classes. It extends the abstract class Command with an execute functionality, to facilitate the execution of the command. Specifically, the compare feature is implemented through the following components and operations:
-
CompareCommand— Core component responsible for executing the comparison of two TA applicants in the list. -
Person— Represents the TA applicants with their respective fields, such asGpa, to be used for comparison. -
CompareCommandParser— Contains the functionalities for user input parsing. It ensures that user input is valid as a compare command by meeting specific requirements. -
CompareWindow— Main User Interface (UI) for after a compare command is successfully executed. It will display the content of the two TA applicants side by side.
Given below is an example usage scenario and how the compare mechanism behaves at each step.
Step 0. Assume that there is an existing list of applicants in the application after launch.
Step 1. The user enters the compare command compare 1 2 to compare the first and second applicants in the existing list. The CompareCommandParser is invoked to parse the user’s input.
Step 2. CompareCommandParser will then invoke ParserUtil for parsing of the indices and check for index errors. If indices are invalid, the system will generate an error message. The error message will be displayed to the user, providing clear feedback about the issue and the specific constraints that are not met.
Step 3. If indices are valid, CompareCommand#execute() fetches the two intended applicants from the currently visible list and ensures that both indexes do not point to the same applicant.
Step 4. Then, CompareCommand#execute() creates a new CompareWindow instance which is immediately shown, with the two applicants’ information passed to CompareWindow, in the form of the Person model.
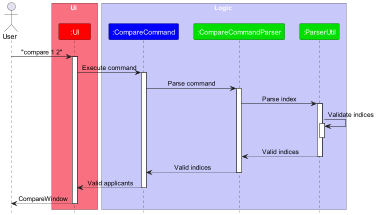
The following sequence diagram displays how the compare function works until Step 4:
Step 5. CompareWindow handles the GUI presentation aspects, in the form of a pop-up window. It uses the JavaFX GridPane layout to display the respective Person attributes side-by-side.
Step 6. A success message is displayed to the user to confirm that the comparison of applicants is successful.
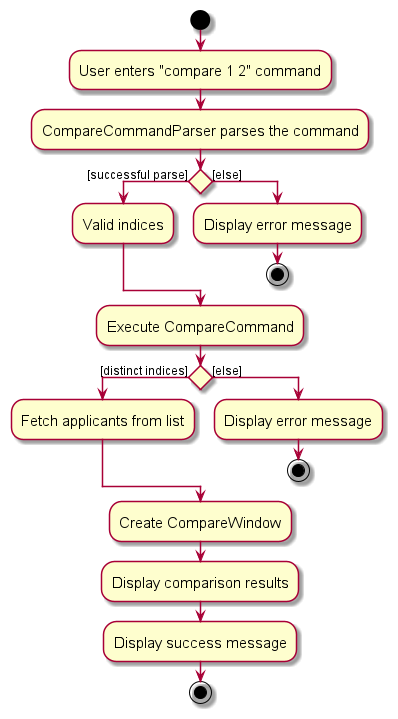
The following activity diagram summarizes what happens when a user executes a compare command:
Comment feature
The comment command allows users to insert a comment on TA applicants in TAfinder app.
Implementation
The comment mechanism is mainly facilitated by the CommentCommand and CommentCommandParser classes. It extends the abstract class Command with an execute functionality, to facilitate the execution of the command. Specifically, the comment feature is implemented through the following components and operations:
-
CommentCommand— Core component responsible for executing the adding of comments to a TA applicant in the list. -
Person— Represents the TA applicants with their respective fields, which includes thecommentfield. -
CommentCommandParser— Contains the functionalities for user input parsing. It ensures that user input is valid as a compare command by meeting specific requirements. -
MainWindow— Main User Interface (UI) for after a comment command is successfully executed. It will display the content of the TA applicant with the comment added.’
Given below is an example usage scenario and how the comment mechanism behaves at each step.
Step 0. Assume that there is an existing list of applicants in the application after launch.
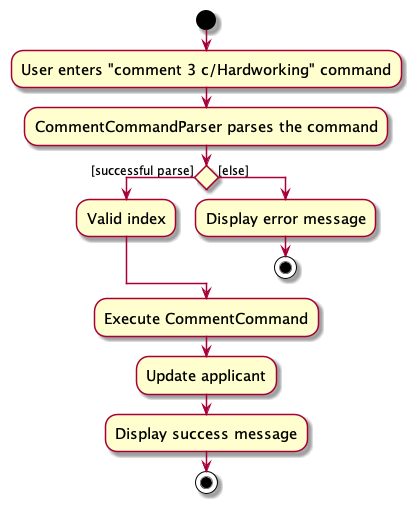
Step 1. The user enters the comment command comment 3 c/Hardworking to comment on the 3rd applicant in the applicant
list with Hardworking as the comment by executing. The CommentCommmandParser is invoked to parse the user’s input.
Step 2. If the index is valid, CommentCommand#execute() fetches the intended applicant from the currently visible list
and adds the comment Hardworking to the applicant with the corresponding index. The adding of comment is destructive,
meaning if the specified applicant has an existing comment, it will be overwritten.
Step 3. CommmentCommandParser will then invoke ParserUtil for parsing of the index and check for index errors.
If the index is invalid, the system will generate an error message. The error message will be displayed to the user,
providing clear feedback about the issue and the specific constraints that are not met.
Step 4. Then, CommentCommand#execute() updates Model#setModel with the updated Person.
Displaying the updated applicant list in MainWindow with the comment added.
Step 5. A success message is displayed to the user to confirm that the comment has been added to the applicant successfully.
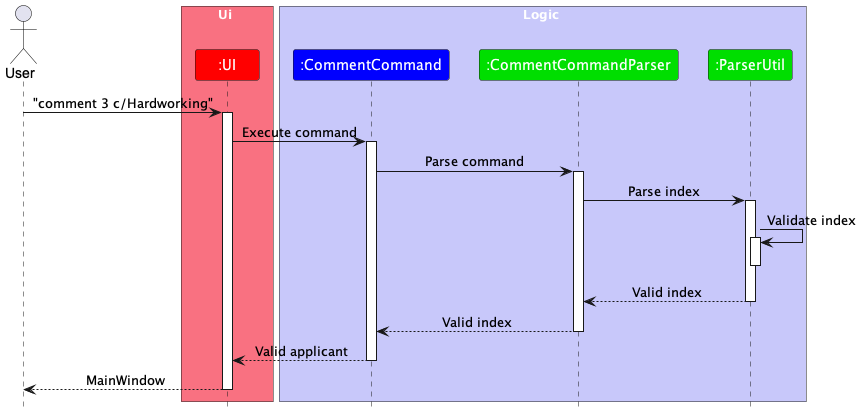
The following activity diagram summarizes what happens when a user executes a comment command:
Design considerations
Aspect: Comparison GUI:
-
Alternative 1 (current choice): Compare two applicants in one pop-up window.
- Pros:
- Easier to implement the pop-up window
- Able to avoid over-dependencies within the UI component.
- Cons: Design may not be uniform with main window.
- Pros:
-
Alternative 2: Compare two applicants in the main window.
- Pros:
- Easy view of information.
- Cons:
- Difficult to implement the UI change when a compare command is inputted, as whole window needs to be modified.
- Inconvenient to refer back to list of applicants if needed.
- Pros:
-
Alternative 3: Compare multiple (two or more) applicants.
- Pros: More convenient to choose between applicants.
- Cons: Harder to implement the UI.
Import feature
The import feature allows users to mass-create applicants within the application, from a list of applicants in a CSV file. This file could be exported from mySoC or elsewhere, as long as it is in the correct format.
Implementation
The format of the CSV file is as follows:
- The file must only contain text separated by commas and newlines — a limited subset of the true CSV file format. No escaping or quoting is allowed.
- The first line must be the header row, containing column names. The columns can be in any order, but must contain the following (case-sensitive):
- studentNo
- name
- phone
- gpa
- previousGrade
- tags
- The following lines contain one applicant per row. The data of the applicant should be in the order of which the header row specified the columns i.e. if column 1 is
studentNo, the first cell of each row should contain the applicant’s student number.
Here is an example CSV:
studentNo,name,phone,email,gpa,previousGrade,tags
A0123486A,Jasmine David,98472983,jasmine_david@u.nus.edu,4.3,B+,deansList;pastTA
A0456123A,Sandeep Kopparthi,86753746,sandeep@u.nus.edu,5.0,B+,pastTA
A0775848D,Lim Boon Kong,97777777,boonkong@u.nus.edu,3.5,C,deansList
A0483910A,Mohammed Taufiq bin Rozaini,85535252,taufiq@u.nus.edu,4.2,A+,
The import mechanism is mainly facilitated by the ImportCommand, ImportCommandParser, and Attachment classes. It extends the abstract class Command with an execute functionality, to facilitate the execution of the command. Specifically, the import feature is implemented through the following components and operations:
-
ImportCommand— Core component responsible for executing the import of TA applicants from the CSV file. -
ImportCommandParser— Contains the functionalities for user input parsing. It ensures that user input is valid as an import command by meeting specific requirements. -
Person— Represents the TA applicants with their respective fields, such asAttachment, which are created and added to the main model. -
Attachment— Represents a reference to a file. This is merely used as a representation and handle to a file rather than to attach to anyPersonin particular.
Given below is an example usage scenario and how the attach mechanism behaves at each step.
Step 0. Assume that there is a valid CSV file to import named applicants.csv, such as the one above, and that it is in the same directory as the tafinder.jar file that was executed.
Step 1. The user enters the import command import applicants.csv to import applicants from the CSV file specified in the previous step.
Step 2. ImportCommandParser will then invoke ParserUtil for parsing of the file path to check for any invalid path characters. If the file path contains invalid path characters, the system will generate an error message. The error message will be displayed to the user, providing clear feedback about the issue and the specific constraints that are not met.
Step 3. If indices are valid, ImportCommand#execute() opens the file and creates a Scanner over the file handle.
Step 4. Then, the header row of the CSV is read and the order of the headers is saved into a map for later reference.
Step 5. Next, a loop is executed to read through the rows of the CSV one-by-one. Each row is split via the comma, then parsed in the order that was recorded in the previous step. Any validation errors found cause a new error line number to be reported as an error, but no exception is thrown as we want to parse as many applicants as possible. A Person instance is created with the relevant data for each successful line i.e. no validation error.
Step 6. Finally, a message is displayed to the user indicating the number of applicants successfully imported, the number of applicants that failed to be imported, and the line numbers containing those failed applicants.
Attach feature
The attach feature allows users to attach files to TA applicants in the app. Attaching files copies these files into the data directory and adds a reference to those files to that Person model. This means that even if the original files are deleted, TAfinder would still have access to the copies of those files.
Implementation
The attachment mechanism is mainly facilitated by the AttachCommand, AttachCommandParser, and Attachment classes. It extends the abstract class Command with an execute functionality, to facilitate the execution of the command. Specifically, the attach feature is implemented through the following components and operations:
-
AttachCommand— Core component responsible for executing the attachment of a file to an applicant. -
AttachCommandParser— Contains the functionalities for user input parsing. It ensures that user input is valid as an attach command by meeting specific requirements. -
Person— Represents the TA applicants with their respective fields, such asAttachment, to attach files to. -
Attachment— Represents a reference to a file. This can be a file that has been “attached” to aPerson, or just a file within the file system of the computer.
Given below is an example usage scenario and how the attach mechanism behaves at each step.
Step 0. Assume that there is an existing list of applicants in the application after launch.
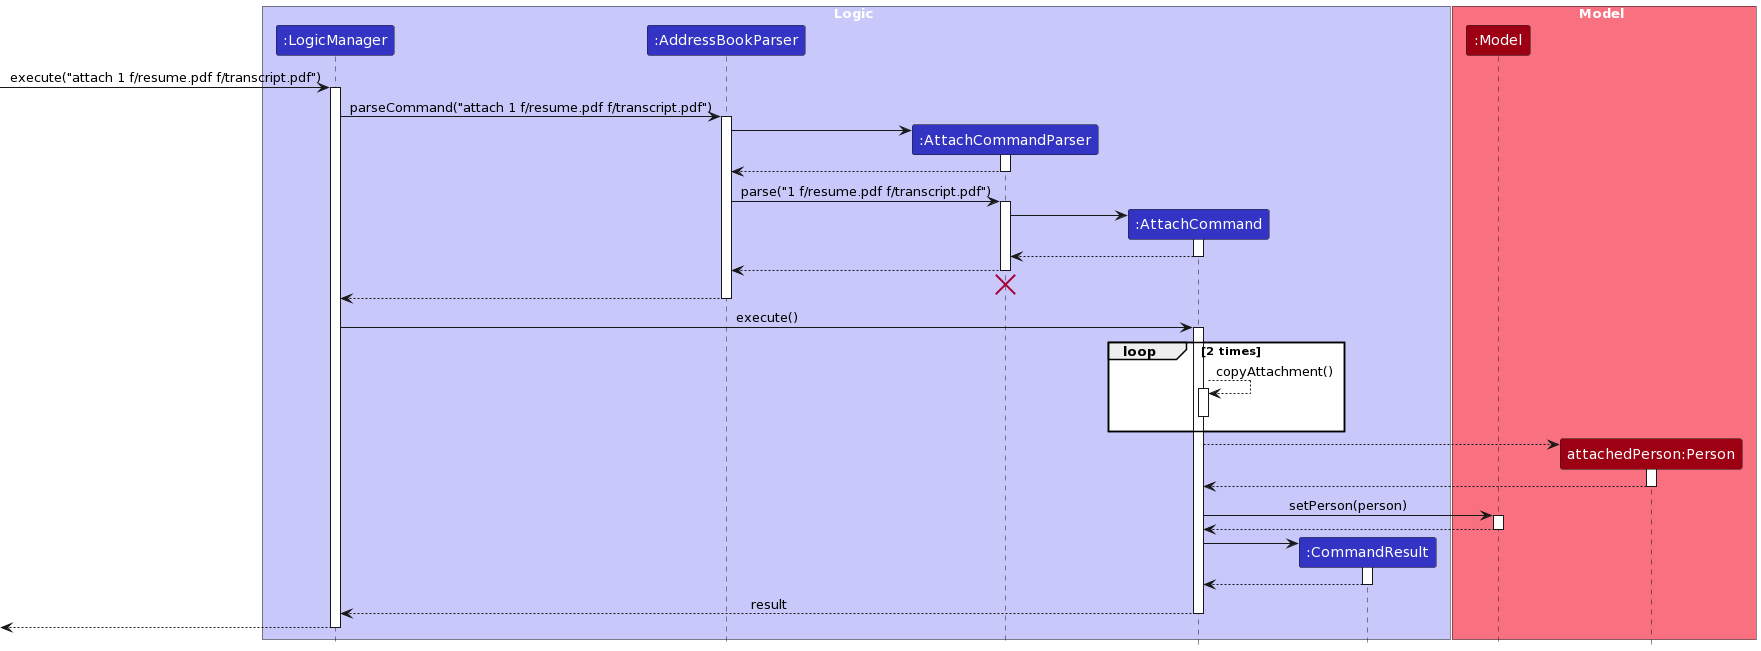
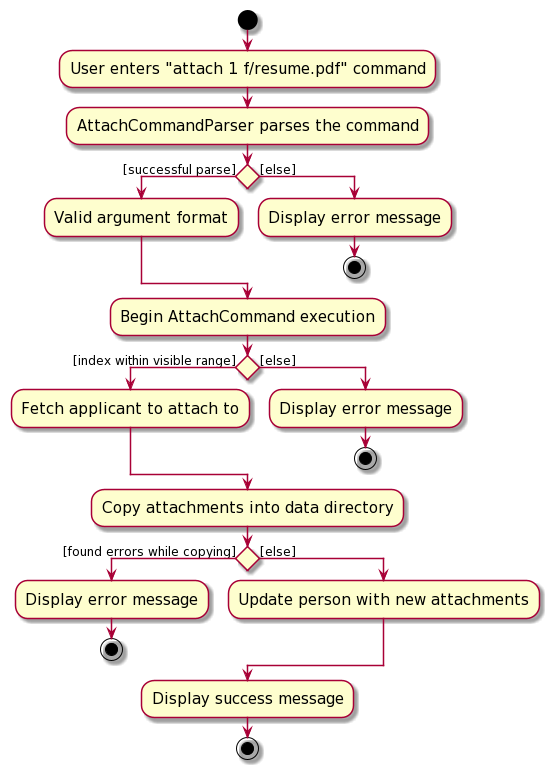
Step 1. The user enters the attach command attach 1 f/Downloads/resume.pdf f/Downloads/cv.txt to attach the files resume.pdf and cv.txt in the Downloads directory to the first user in the visible list.
Step 2. AttachCommandParser will then invoke ParserUtil for parsing of the index and check for index errors, and then parses the file paths to check for any invalid path characters. If index is invalid or the file path contains invalid path characters, the system will generate an error message. The error message will be displayed to the user, providing clear feedback about the issue and the specific constraints that are not met.
Step 3. If indices are valid, AttachCommand#execute() fetches the intended applicant from the currently visible list.
Step 4. Then, AttachCommand#execute() copies each attachment into the data directory, to the path data/attachments/{student number}/{filename}.
Step 5. Finally, a success message is displayed to the user indicating the number of attachments that have been copied.
The following sequence diagram shows how the attach operation works:
The following activity diagram summarizes what happens when a user executes a attach command:
Documentation, logging, testing, configuration, dev-ops
We’ve broken these out into separate guides, do check them out.
Appendix: Requirements
Product scope
Target user profile:
-
University Professors, specifically:
- Tech-savvy
- Within NUS SoC
- Responsible for selecting student TAs
- Managing a significant number of TA applicants
- Can type fast
- Prefers typing over all other means of input
Value proposition:
-
Efficient TA Selection:
- Simplify the process of identifying and selecting qualified TAs within NUS SoC. Find the most suitable TAs from a diverse pool of applicants efficiently.
-
Enhanced Convenience:
- Conveniently connect with students and potential TAs, streamlining communication and making the TA selection process smoother.
-
Effective Evaluation:
- Assess TA applicants based on a range of holistic rubrics, including grades, student life involvement, past TA experiences, etc.
User Stories
High Priority (Must-Have)
| As a… | I want to… | So that I can… |
|---|---|---|
| NUS SOC professor | add a TA applicant and details to the list | see the TA applicant in the list |
| NUS SOC professor | hide a TA applicant from the list | narrow down the list of applicants for review |
| NUS SOC professor | edit the details of a TA applicant | keep their information up-to-date or correct errors |
| NUS SOC professor | click to view the full details of a TA applicant | determine if they’re a fit for the position accordingly |
| NUS SOC professor | search for a specific TA applicant by name or details | easily find their information without scrolling |
| NUS SOC professor | delete a TA applicant | remove entries that are no longer needed |
Medium Priority (Nice-to-Have)
| As a… | I want to… | So that I can… |
|---|---|---|
| NUS SOC professor who wants the best for my students | sort TA applicants by grades or other factors | find the best TA applicant for my module |
| NUS SOC professor | add comments/notes for myself on a TA applicant | refer to them when comparing applicants |
| NUS SOC professor | export the list of TA applicants to a spreadsheet | easily share the list with colleagues or refer to it offline |
| NUS SOC professor | compare between two TA applicants on the same screen | make a final decision on selecting the TA for my module |
| NUS SOC professor | rate and provide feedback on TA applicants after interviews or assessments | collaborate with colleagues on the hiring decision. |
| NUS SOC professor | attach files (e.g., resumes) to TA applicant profiles | keep all pertinent information in one place. |
Low Priority (Unlikely to Have)
| As a… | I want to… | So that I can… |
|---|---|---|
| NUS SOC professor | set up automated notifications for when new TA applicants apply | stay informed without constantly checking the list. |
| NUS SOC professor | send TA applicants invitations and reminders | schedule interviews with TA applicants directly through the system. |
| NUS SOC professor | track the progress and performance of hired TAs throughout the semester | provide feedback and assess their contributions. |
| NUS SOC professor | filter applicants by availability and schedule | match them with suitable time slots for my module |
| NUS SOC professor | set up automatic reminders for TA performance evaluations | stay organized and proactive in managing my teaching assistants. |
| NUS SOC professor | track the number of applicants for each TA position | gauge the level of interest and competition for specific roles. |
| NUS SOC professor | archive or store past TA applicant data | reference them in future semesters or academic years. |
| NUS SOC professor | sort the list of TA applicants by their application status | streamline the selection process. |
| NUS SOC professor | archive previous TA applicant profiles | maintain a historical record of applicants. |
| NUS SOC professor | create and manage multiple TA applicant lists | keep information organized for different modules or terms. |
| NUS SOC professor | batch process approvals or rejections of TA applications | save time during the selection process. |
| NUS SOC professor | access a help feature within the platform | understand how to use different functionalities efficiently. |
| NUS SOC professor | customize the appearance and layout of the TA applicant list | enhance the user experience. |
| NUS SOC professor | flag TA applicants for further review | remember to revisit certain profiles as the process continues. |
| NUS SOC professor | generate reports summarizing TA applicant data | easier overview and presentation to department heads or committees. |
| NUS SOC professor | retrieve deleted or archived TA applicant data | recover information if needed. |
| NUS SOC professor | access a log of all actions performed on the system | enhance security and accountability. |
| NUS SOC professor | receive recommendations on TA applicants based on AI analysis | facilitate a smarter selection process. |
| NUS SOC professor | import a spreadsheet of TA applicants to my module | save time by not adding them individually |
| NUS SOC professor | search for a TA applicant using an identifier | contact the TA directly if needed |
Use cases
(For all use cases below, the System is TAfinder and the Actor is NUS SOC professor, unless specified otherwise)
UC01 - Edit an applicant
Preconditions:
- User is logged into the system.
- There is at least one applicant in the list.
MSS
- User requests to edit an applicant’s information.
- System requests the index of the applicant to edit.
- User specifies the index and information.
- System validates the input.
- System updates the applicant’s information.
-
System shows the updated list of applicants.
Use case ends.
Extensions
-
4a. The given index or information is invalid.
-
4a1. System shows an error message.
Use case resumes at step 2.
-
UC02 - Compare Two Applicants
Preconditions:
- User is logged into the system.
- There are at least two applicants in the list.
MSS
- User requests to compare two applicants.
- System requests the indices of the first and second applicants to compare.
- User specifies the indices.
- System validates the input.
-
System retrieves the information of both applicants.
Use case ends.
Extensions:
- 4a. The given indices are missing or invalid.
- 4a1. System shows an error message
Use case resumes at step 2.
{More to be added}
Non-Functional Requirements
- Should work on any mainstream OS as long as it has Java
11or above installed. - Should be able to hold up to 1000 persons without a noticeable sluggishness in performance for typical usage.
- A user with above average typing speed for regular English text (i.e. not code, not system admin commands) should be able to accomplish most of the tasks faster using commands than using the mouse.
- Should be able to process user inputs in at most 100 milliseconds.
- Should have intuitive and easy-to-use commands that corresponds closely to their use cases (i.e. ‘add’ to add an item).
- Non-trivial methods and classes should be well-documented.
- Should provide a comprehensive help section accessible to professors for all the different features.
Glossary
- Mainstream OS: Windows, Linux, Unix, OS-X
- TA (Teaching Assistant): A graduate or undergraduate student who assists a professor in teaching activities, such as grading, leading discussions or conducting tutorials.
- NUS professor: A faculty member at the National University of Singapore (NUS) responsible for teaching and academic activities.
Appendix: Instructions for Manual Testing
Launch and shutdown
- Initial launch
- Download the jar file and copy into an empty folder
- Open a command-line and navigate to the directory the jar file is in
- Run the command
java -jar tafinder.jar. Expected: Shows the GUI with a set of sample TA applicants. The window size may not be optimum.
- Shutdown
- Click “File”
- Click “Exit”. Expected: The app closes.
Hide and unhide
- Hide the first applicant
- Run
hide 1. Expected: The first applicant disappears. - Run
list hidden. Expected: Only the first applicant is shown.
- Run
- Unhide the hidden applicant
- Run the commands above beforehand to have a hidden applicant
- Run
list hidden - Run
unhide 1. Expected: All the applicants are shown including the unhidden first applicant.
- Unhide all applicants
- Ensure there are at least 2 applicants in the current view.
- Run
list - Run
hide 1thenhide 1again. Expected: The first 2 applicants disappear. - Run
unhide-all. Expected: The first 2 applicants appear in the list again.
Bookmark and unbookmark
- Bookmark the first applicant
- Run
bookmark 1. Expected: The bookmark icon next to the first applicant becomes filled. - Run
list bookmarked. Expected: All the applicants that are bookmarked are shown.
- Run
- Unbookmark the first applicant
- Run the commands above beforehand to have a bookmarked applicant
- Run
list bookmarked - Run
unbookmark 1. Expected: The unbookmarked applicant disappears from the list, so only the remaining bookmarked applicants are shown.
Sort
- Run
list. - Run
sort gpa. Expected: The applicants should be sorted by GPA in descending order.
View
- Run
view 1. Expected: All the details of the applicant with the index 1 are shown in the detail view.
Compare
- Ensure that there are at least 2 applicants in the current view
- Run
compare 1 2. Expected: A new window is created with details from both applicants.
Import
- Copy and paste the file below into a file called
sample.csvin the same directory as the jar file - Run
import sample.csv. Expected: 4 applicants are successfully imported into TAfinder.
studentNo,name,phone,email,gpa,previousGrade,tags
A0123486A,Jasmine David,98472983,jasmine_david@u.nus.edu,4.3,B+,deansList;pastTA
A0456123A,Sandeep Kopparthi,86753746,sandeep@u.nus.edu,5.0,B+,pastTA
A0775848D,Lim Boon Kong,97777777,boonkong@u.nus.edu,3.5,C,deansList
A0483910A,Mohammed Taufiq bin Rozaini,85535252,taufiq@u.nus.edu,4.2,A+,
Attach
- Download or create a sample PDF file (you can use the exported user guide as a sample) and place it in the same directory as the jar file
- Ensure there is at least one applicant in the list
- Run
attach 1 f/name-of-file.pdf. Expected: The file is attached to the first applicant by indication of filename in applicant details. The details can be viewed by running the commandview 1.
Appendix: Effort
Difficulty Level
- Numerous challenges were encountered during the project’s execution.
- One of the challenges we faced was working together as a team and coordinating efforts to minimize merge conflicts. We held regular team meetings to discuss progress and identify conflicts. We used version control tools like Git to track changes and resolve conflicts early. We divided tasks among team members and established coding conventions for consistency. When conflicts occurred, we had a designated merge manager to resolve them. By prioritizing communication, planning, and conflict resolution, we minimized the impact of merge conflicts on our project.
- Another major challenge we faced was managing and meeting tough deadlines as the project became more complex. To address this, we prioritized tasks based on importance and urgency, adjusted our timeline as needed, communicated openly within the team, and optimized productivity by leveraging our strengths. With this proactive and strategic approach, we successfully met the deadlines and delivered high-quality results.
- Overall, we found this project to be challenging but rewarding. It provided us with opportunities to enhance our technical skills, collaborate effectively as a team, and overcome various obstacles. Despite the difficulties, we are proud of the accomplishments and growth we achieved throughout the project.
Effort Required
- Reused
modelclasses that were already implemented (e.g.AddressBookParser,Person) - Reused
uiclasses and FXML files for certain parts of the overall GUI (eg. input box, message box) - Reused
Storageclasses that saves and loads data from files
Achievements
- For most of us, this was our first experience contributing pull requests (PRs) to a project that was already established and had some existing code (known as a brownfield project).
- This opportunity allowed us to expand our skills and knowledge beyond just working on Orbital, and gave us valuable experience in working with a larger and more complex codebase.
- By contributing to a brownfield project, we were able to gain insights into the challenges of maintaining and improving existing code, and learn from the expertise of other developers who had worked on the project before us.
Appendix: Planned Enhancements
-
Limiting GPA Field to 2 Decimal Places
- The current
GPAfield can accept more than 2 decimal places. We plan to limit the field to strictly 2 decimal places, and anything more than that will generate an error message.
- The current
-
Limiting Phone Number Field to At Most 8 Numbers
- The current
phone numberfield accepts unlimited numbers. We plan to limit the field to at most 8 numbers (length of phone number in Singapore), as our target audience is NUS professors and Teaching Assistants (TAs).
- The current
-
Requiring Alphabetical Characters in the Name Field
- The current
namefield accepts a string of only numbers as a name, which should not be the case. We plan to limit the field to require alphabetical characters, and anything else would result in an error message.
- The current
-
Improving Display of Added Applicant Message
- When a person is successfully added using the
addcommand but there is nocommentfield for the person, the current main UI window will display a messageNew applicant added: erferferferf Doe; Phone: 98765432; Email: [johnd@example.com](mailto:johnd@example.com); GPA: 4.9; Comment: Optional.empty; Tags: [pastTA], with a defaultOptional.emptystring for the Comment field. We plan to enhance the message by removing the display of theCommentfield, when none is added.
- When a person is successfully added using the
-
Improving Error Messages for Commands Requiring an Index
- Currently, our application only accepts positive numbers (1, 2, 3…) as acceptable inputs that conform to the command format for commands that require indexes (it then validates these numbers to check the range etc.). Therefore, non-positive numbers (0, -1…) are considered as invalid formatting of the errors. Thus, the current error message is ‘
Invalid command format!'. We plan to change the error message to better reflect the issue with non-positive numbers rather than have a generic invalid command format message.
- Currently, our application only accepts positive numbers (1, 2, 3…) as acceptable inputs that conform to the command format for commands that require indexes (it then validates these numbers to check the range etc.). Therefore, non-positive numbers (0, -1…) are considered as invalid formatting of the errors. Thus, the current error message is ‘
-
Making Applicants in List Clickable
- Although there is visual feedback on clicking each of the applicants, the details shown on the right side of the application does not change. We plan to allow the clicking of applicants in addition to the command
view INDEXto show the details of each applicant.
- Although there is visual feedback on clicking each of the applicants, the details shown on the right side of the application does not change. We plan to allow the clicking of applicants in addition to the command
-
Enhancing Compare Command Popup Window
- Upon successfully invoking the
comparecommand, a popup window will be displayed. However, if any of the applicants’ details (fields) are too long, the details will not be able to be displayed fully. We plan to enhance the popup window by allowing the details to be displayed fully by implementing scroll panels for each field instead.
- Upon successfully invoking the
-
Adjusting Color Schemes of Help and Compare Windows
- The current UI color scheme for the help and compare windows, currently grey, differ quite a bit from the main window, where the color scheme is purple-centric. We plan to adjust the color schemes of these 2 pop-up windows to match that of the main window.
-
Limiting Interview Score Field to 2 Decimal Places
- The current
Interview Scorefield can accept more than 2 decimal places. We plan to limit the field to strictly 2 decimal places, and anything more than that will generate an error message.
- The current
-
Preventing Integer Overflow When Adding Applicants
- If the user were to add more than 2147483647 (max integer for Java), an integer overflow error may result on the input of any command. Our enhancement would be to prevent users from adding more applicants when 2147483647 applicants are already in the list.