User Guide
Overview
Introducing TAfinder - the one-stop solution for all your Teaching Assistant (TA) selection needs.
As an NUS School Of Computing (SOC) professor, with TAfinder, you can easily:
- Manage troves of TA applicants.
- Make more informed decisions with the help of our compare and sort functions.
- Import data to the TAfinder application.
TAfinder utilises a Command Line Interface (CLI), while still enjoying the benefits of a Graphical User Interface (GUI), for a more efficient user experience.
So say goodbye to the days of manually sifting through hundreds of TA applications. Enrich your TA selection process with the power of TAfinder today!
About This Guide
This guide shows you the relevant information for setting up and using TAfinder to manage your TA applications.
You can click on any of the links below to navigate to the respective sections for more information.
Table of Contents
- Overview
- About This Guide
- Table of Contents
- Quick start
- Features
- Data Management
- FAQ
- Known Issues
- Summary
Quick start
Prerequisites
Java
Ensure you have Java 11
or above installed. Java is the language that your computer uses to understand TAfinder.
![]() Not sure how to check your Java version?
Not sure how to check your Java version?
Step 1. Open up Command Prompt (Windows) or Terminal (Mac and Linux).
Step 2. Type and run the command java -version.
Step 3. Check the version number provided (xxx) is at least 11.
An example is shown below:
  > java -version
  java version "xxx" <Other information>
Glossary
| Words/Abbreviations | Explanation |
|---|---|
| TA | Teaching Assistant. |
| Applicant | Applicant refers to a student who has applied as a TA. |
| Mainstream OS | Windows, Linux or Mac. |
| CLI | Command-Line Interface. |
| GUI | Graphical User Interface. |
| Toast | A popup alert to inform users about certain information. |
| Tag | Tags are associated with applicants, users can tag applicants with any keyword they want, the number of tags are not restricted. |
Installation
Step 1. Download the latest tafinder.jar file from here.
Step 2. Copy the file to the folder you want to use as the home folder for your TAfinder.
Step 3. Double-click on the tafinder.jar file to start the TAfinder app.
![]() TAfinder does not open?
TAfinder does not open?
Step 1. Open a command terminal.
Step 2. Navigate to the location of the tafinder.jar file.
Step 3. Type in java -jar (Keep in mind of the space at the end).
Step 4. Drag and drop tafinder.jar into the command terminal.
Step 5. Press enter and execute the command.
An example of the final command is displayed below:
> java -jar xxxx/xxxx/tafinder.jar
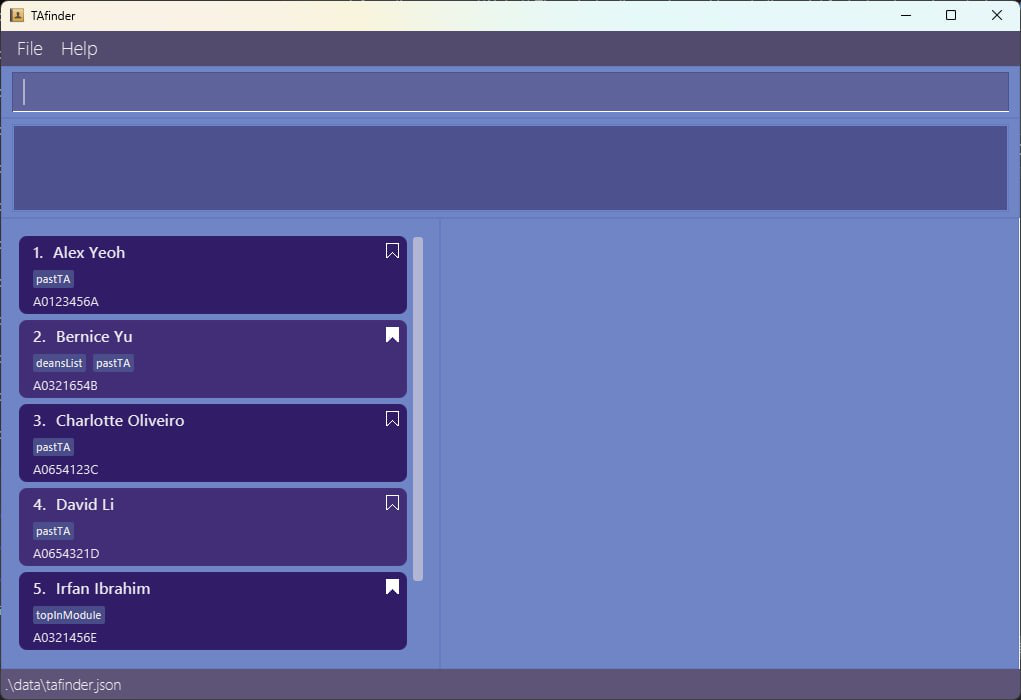
The GUI similar to the below should appear in a few seconds:
Utilisation
Step 1: Type the command in the Command Input Box and press Enter to execute it. e.g. typing help and
pressing Enter will open the help window.
Some example commands you can try:
-
list: Lists all applicants. -
add s/A0251647W n/Harry Lee p/89064678 e/harry@example.com g/4.3 pg/A: Adds an applicant named “Harry Lee” to the list. -
delete 3: Deletes the 3rd applicant shown in the current list. -
clear: Deletes all applicants. -
exit: Exits the app.
Step 2: Observe the changes to the application.
![]() Not sure what the commands above do?
Not sure what the commands above do?
- Find all about the usable commands here.
- Look at a summary of all the usable commands here.
- Return to the Table of Contents to find your desired command.
Navigating the User Interface
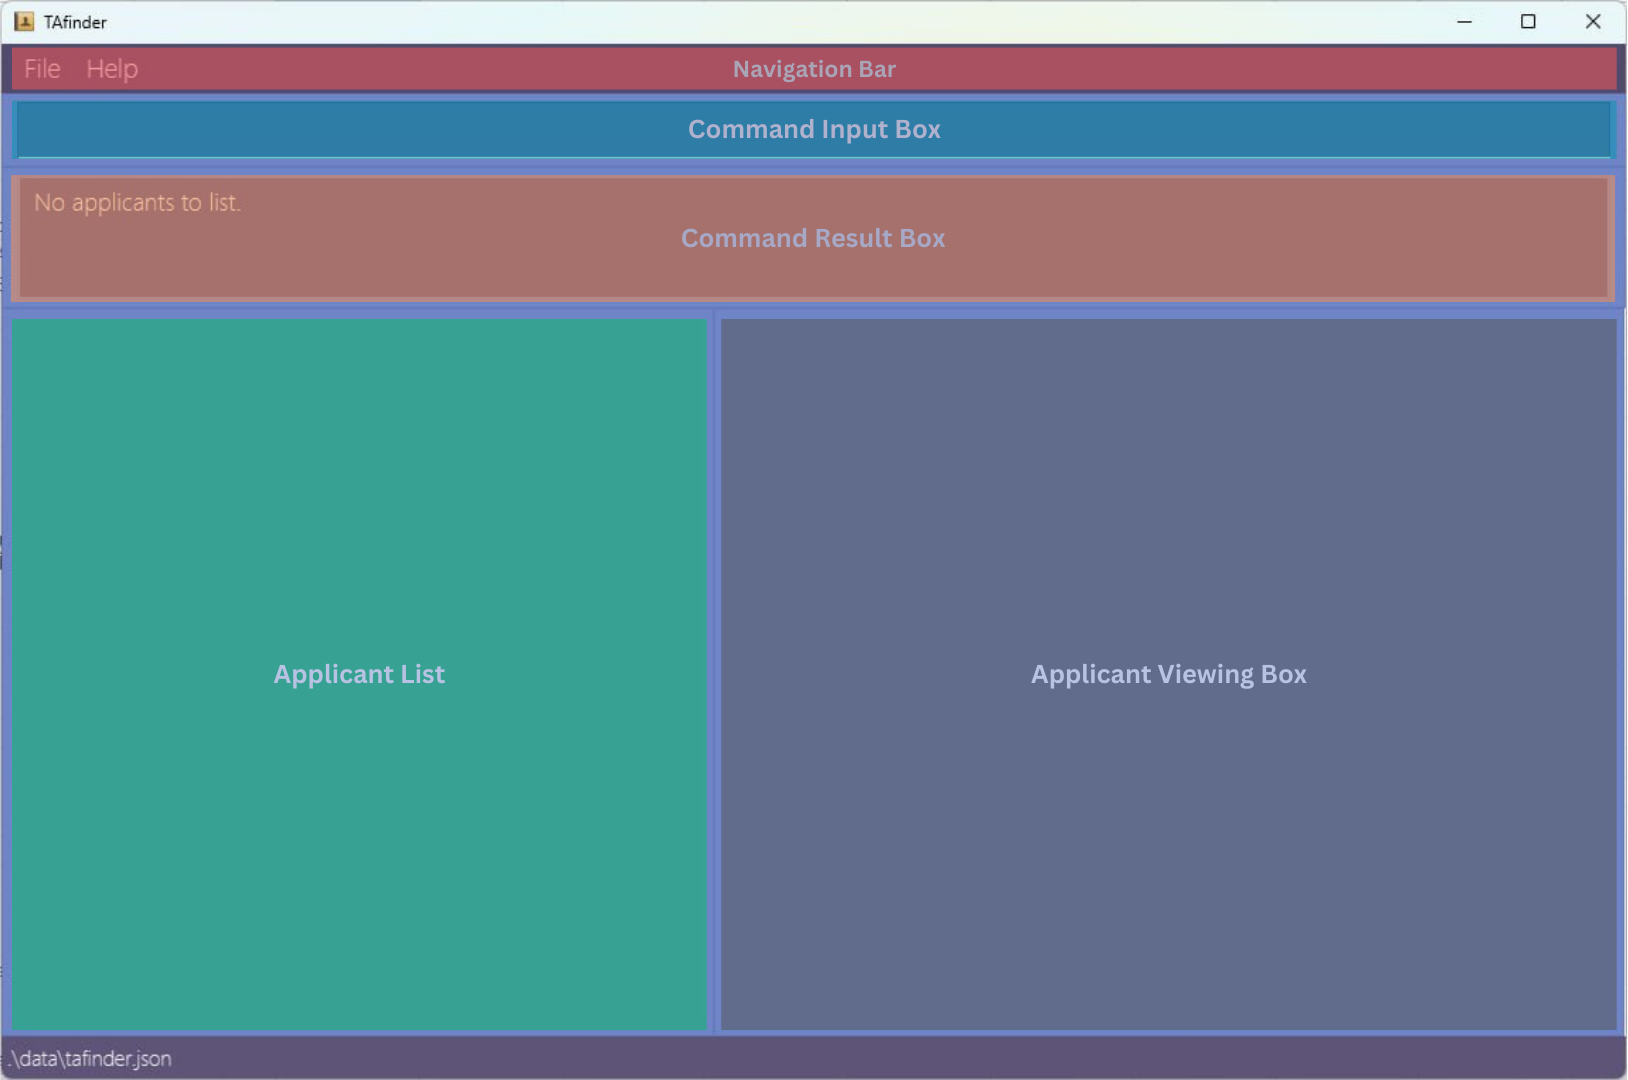
The UI has the following areas:
-
Navigation Bar
- This is where you can navigate to the
FileandHelpmenus.
- This is where you can navigate to the
-
Command Input Box
- This is where commands are typed.
- Press
Enterto execute it.
-
Command Result Screen
- This is where the result of entering a command is displayed.
-
Applicant List
- This is where the list of applicants is displayed.
-
Applicant Viewing Box
- This is where the details of the selected applicant is displayed after the command
viewis executed.
- This is where the details of the selected applicant is displayed after the command
![]() Not sure what
Not sure what view does?
- Find out more about
viewhere.
Features
![]() Notes about the command format:
Notes about the command format:
-
Words in
UPPER_CASEare the parameters to be supplied by the user.
e.g.add n/NAME,
NAMEis a parameter which can be used asadd n/John Doe. -
Items in square brackets are optional.
e.g.n/NAME [t/TAG],
can be used asn/John Doe t/friendor asn/John Doe. -
Items with
… after them can be used zero or more times.
e.g.[t/TAG]…,
can be used as ` ` (i.e. 0 times),t/friend,t/friend t/familyetc. -
Parameters can be in any order.
e.g. if the command specifiesn/NAME p/PHONE_NUMBER,
p/PHONE_NUMBER n/NAMEis also acceptable. -
Extraneous parameters will be ignored.
e.g. if the command specifieshelp 123, it will be interpreted ashelp. -
If you are using a PDF version of this document, be careful when copying and pasting commands that span multiple lines as space characters surrounding line-breaks may be omitted when copied over to the application.
Basic applicant management
Adding an applicant: add
Format:
add s/STUDENT_NUMBER n/NAME p/PHONE e/EMAIL g/GPA [pg/PREVIOUS_GRADE] [is/INTERVIEW_SCORE] [c/COMMENT] [t/TAG]…
-
s/STUDENT_NUMBER: Student number of the applicant. -
n/NAME: Name of the applicant. -
p/PHONE: Phone number of the applicant. -
e/EMAIL: Email address of the applicant. -
g/GPA: GPA of the applicant. -
pg/PREVIOUS_GRADE: Previous grade of the applicant. -
[is/INTERVIEW_SCORE]: Interview score of the applicant. -
[c/COMMENT]: Comments for the applicant. -
[t/TAG]: Tags of the applicant.
![]() You can add more than 1 tag to an applicant by adding more
You can add more than 1 tag to an applicant by adding more t/TAG parameters.
Examples:
add s/A0251647W n/amanda p/89064678 e/amanda@example.com g/4.3 pg/A
- Adds an applicant with the following information:
- Student number: A0251647W
- Name: Amanda
- Phone number: 89064678
- Email address: amanda@example.com
- GPA: 4.3
- Previous grade: A
add s/A0269357C n/john doe p/91234567 e/johndoe@example.com g/5.0 pg/A- is/8.9 c/Hardworking t/pastTA t/deanslist
- Adds an applicant with the following information:
- Student number: A0269357C
- Name: John Doe
- Phone number: 91234567
- Email address: johndoe@example.com
- GPA: 5.0
- Previous grade: A-
- Interview score: 8.9
- Comment: Hardworking
- Tags: pastTA, deanslist
Following the example above, if you entered everything correctly, you should see the following:
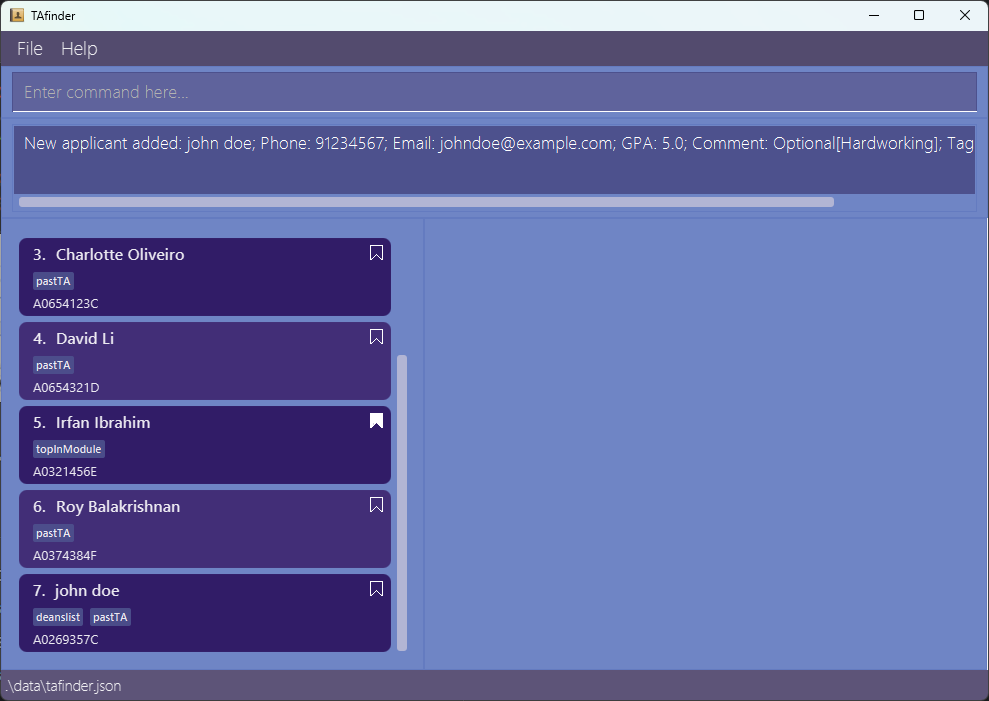
Expected Outputs:
- Successfully added an applicant.
- Confirmation message:
New applicant added: Student number: <student number>; Name: <name>; Phone: <phone>;
Email: <email>; GPA: <gpa>; Previous grade: <previous grade>; [Interview score: <interview score>];
[Comment: <comment>]; [Tags: <tags>].
Erroneous Outputs:
Invalid command format:
Invalid command format!
add: Adds an applicant to the list. Parameters: s/STUDENT NUMBER n/NAME p/PHONE e/EMAIL g/GPA pg/PREV GRADE
[is/INTERVIEW SCORE] [c/COMMENT] [t/TAG]...
Example: add s/A0343434C n/John Doe p/98765432 e/johnd@example.com g/4.9 pg/A is/9.1 c/Hardworking and diligent t/pastTA
Repeated applicant:
This applicant already exists in the applicant list.
Editing an applicant: edit
Format:
edit INDEX [s/STUDENT NUMBER] [n/NAME] [p/PHONE] [e/EMAIL] [g/GPA] [pg/PREVIOUS_GRADE] [is/INTERVIEW_SCORE] [c/COMMENT] [t/TAG]…
-
INDEX: The index of the applicant to edit. The index must be a positive integer (e.g., 1, 2, 3…). -
[optional fields]: At least one of the following optional fields must be provided for editing:-
s/STUDENT NUMBER: Student number of the applicant. -
n/NAME: Name of the applicant. -
p/PHONE: Phone number of the applicant. -
e/EMAIL: Email address of the applicant. -
g/GPA: GPA of the applicant. -
pg/PREVIOUS_GRADE: Previous grade of the applicant. -
c/comment: Comment of the applicant. -
is/INTERVIEW_SCORE: Interview score of the applicant. -
t/TAG: Tags of the applicant. Note that editing tags will replace existing tags; it is not cumulative. - To remove all existing tags, use
t/without specifying any tags after it.
-
Examples:
edit 1 p/91234567 e/johndoe@example.com
- Edits the following fields of the first person in the list:
-
Phone number:
91234567 -
Email address:
johndoe@example.com
-
Phone number:
edit 2 n/Alex Yeoh t/
- Edits the following fields of the second person in the list:
-
Name:
Betsy Crower - Clears all existing tags
-
Name:
Following the example above, if you entered everything correctly, you should see the following:
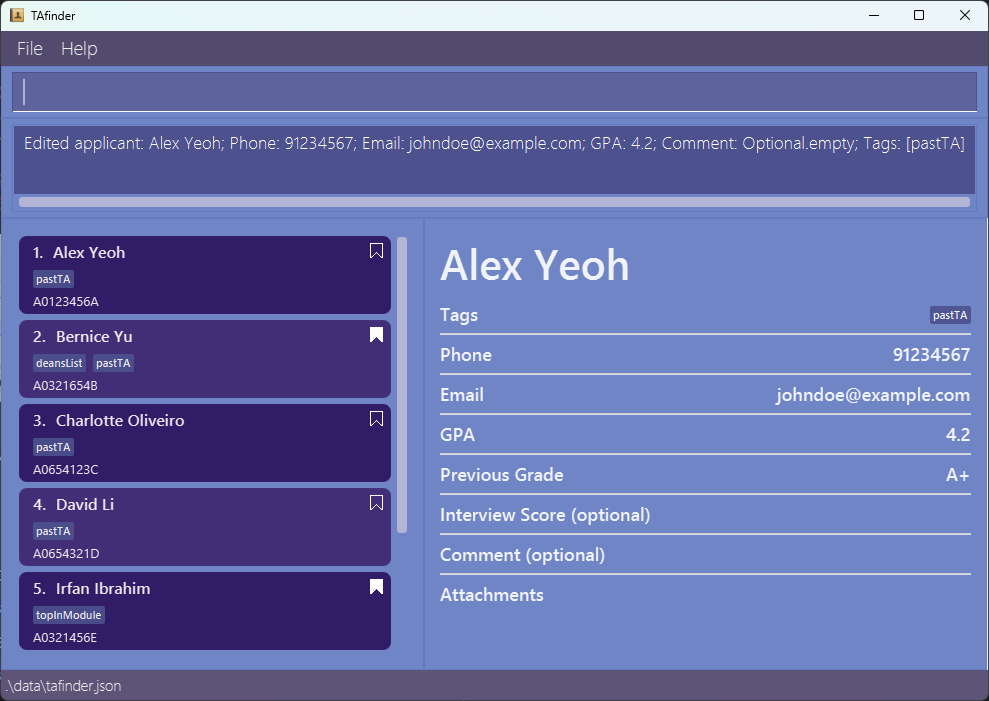
Expected Outputs:
- Successfully edited an applicant.
- Confirmation message:
Edited applicant: Student number: <student number>; Name: <name>; Phone: <phone>; Email: <email>; GPA: <gpa>; Comment: <comment>; Tags: <tags>
Erroneous Outputs:
Invalid command format:
Invalid command format!
edit: Edits the details of the applicant identified by the index number used in the displayed applicant list. Existing values will be overwritten by the input values.
Parameters: INDEX (must be a positive integer) [n/NAME] [p/PHONE] [e/EMAIL] [g/GPA] [c/COMMENT] [t/TAG]...
Example: edit 1 p/91234567 e/johndoe@example.com
Index out of range:
Error: Invalid index. Please enter an index within range.
Deleting an applicant: delete
Format:
delete INDEX
INDEX: The index corresponding to the applicant to be deleted. The index must be a positive integer (e.g., 1, 2, 3…).
Examples:
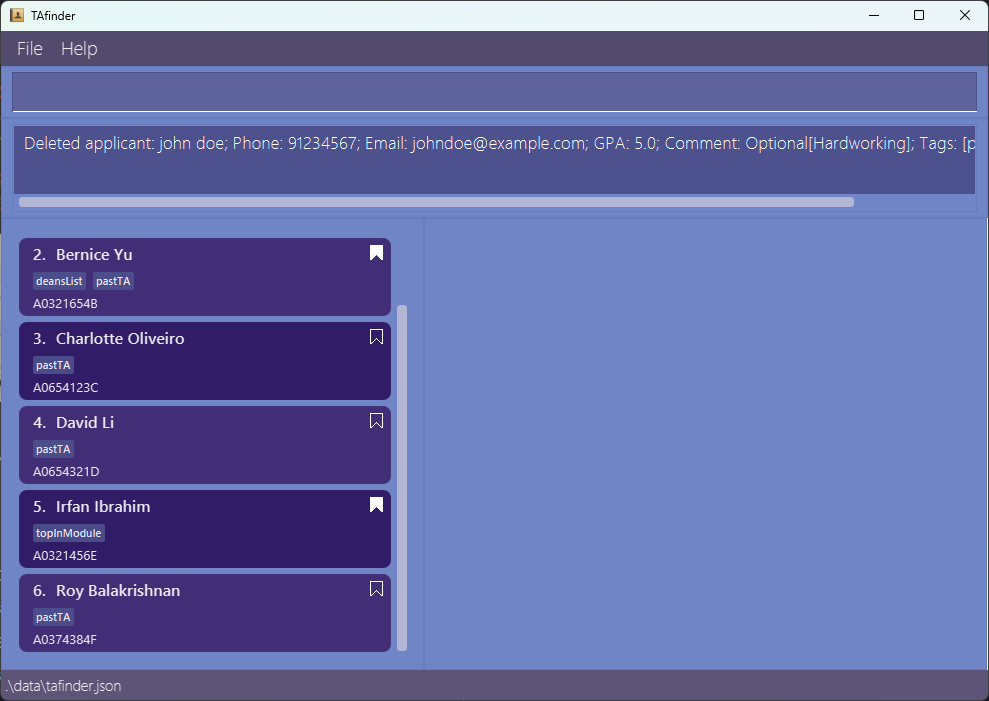
delete 3
- Deletes the third applicant in the list.
Expected Outputs:
- Successfully deleted an applicant.
- Confirmation message:
Deleted applicant: Student number: <student number>; Name: <name>; Phone: <phone>; Email: <email>; GPA: <gpa>; Comment: <comment> ; Tags: <tags>.
Erroneous Outputs:
Missing index:
Invalid command format!
delete: Displays the applicant identified by the index number used in the displayed applicant list.
Parameters: INDEX (must be a positive integer)
Example: delete 1
Index out of range:
Error: Invalid index. Please enter an index within range.
Listing all applicant: list
Format:
list / list hidden / list bookmarked
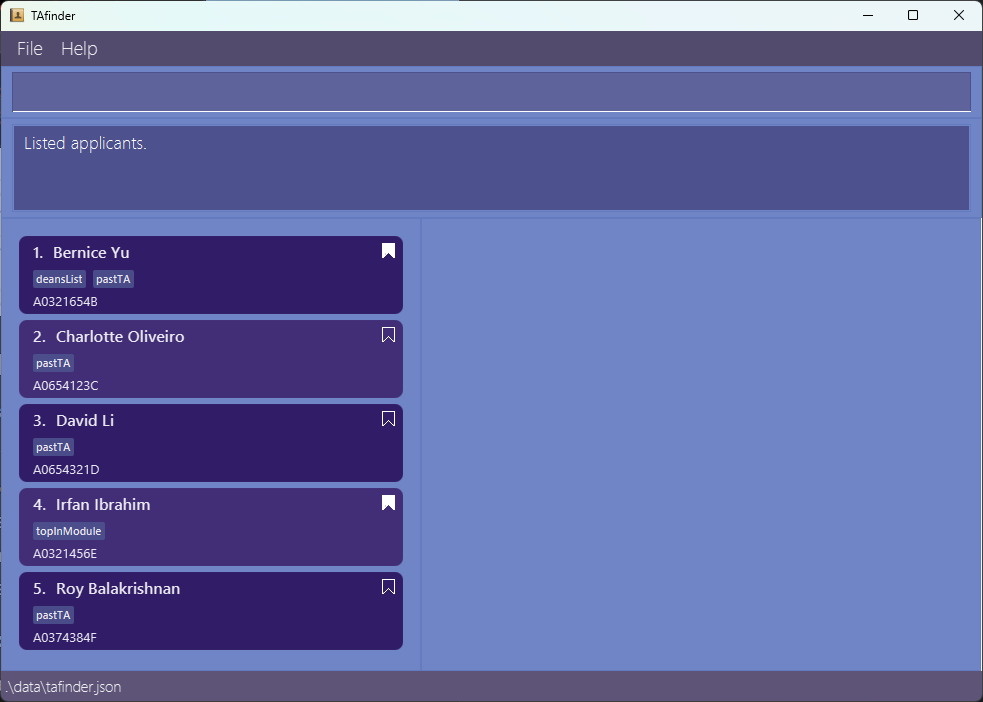
list
- Shows a list of all applicants.
list hidden
- Shows a list of all hidden applicants.
list bookmarked
- Shows a list of all bookmarked applicants.

Viewing the details of a single applicant: view
Displays the details of a specified applicant in the details panel.
Format:
view INDEX
INDEX: The index corresponding to the applicant you want to be displayed. The index must be a positive integer (e.g., 1, 2, 3…).
Examples:
view 3
- Displays the following details about the third applicant.
- Name
- Tags
- Phone number
- Email Address
- GPA
- Previous Grade
- Interview Score
- Comments
- Attachments
Following the example above, if you entered everything correctly, you should see the following:
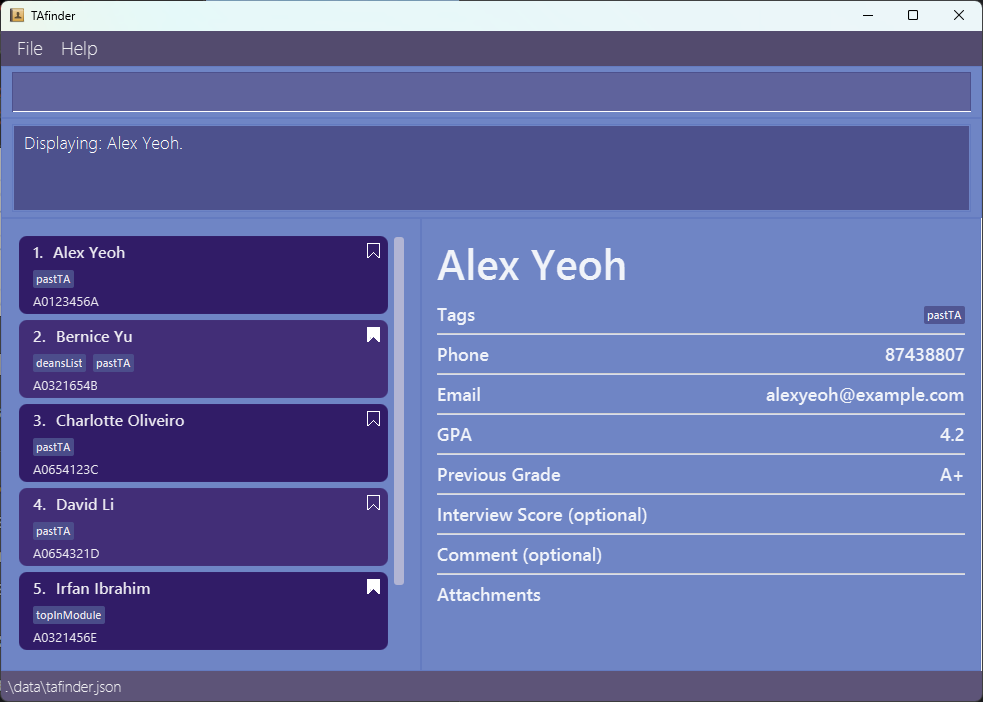
Expected Outputs:
Sample display of the details of an applicant:
Name: John DoeTags: pastTA, deansListPhone Number: 91234567Email Address: johndoe@example.comeGPA: 5.0Previous Grade: AInterview Scorw (optional): 8Comment (optional): Good fit, has teaching experienceAttachments: Resume.pdf
Confirmation message:
Displaying: APPLICANT_NAME.
Erroneous Outputs:
Missing index:
Invalid command format!
view: Displays the applicant identified by the index number used in the displayed applicant list.
Parameters: INDEX (must be a positive integer)
Example: view 1
Index out of range:
"Error: Invalid index. Please enter an index within range."
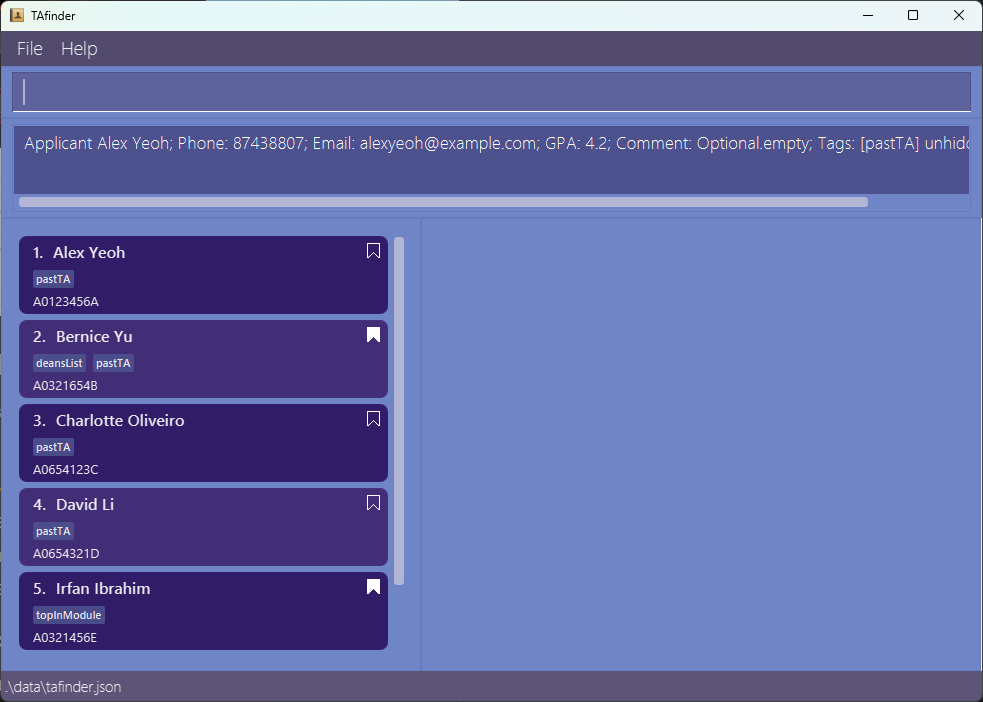
Hiding an applicant from list: hide/unhide
Hides/unhides an applicant from the list of applicants.
Format:
hide INDEX / unhide INDEX / unhide-all
hide INDEX
- Hides the applicant at the specified INDEX from all future lists. The index refers to the number shown in the displayed person list.</br> Index must be a positive integer (e.g. 1, 2, 3…).

unhide INDEX
- Unhides the applicant at the specified INDEX from all future lists. The index refers to the number shown in the displayed person list. </br> Index must be a positive integer (e.g. 1, 2, 3…).
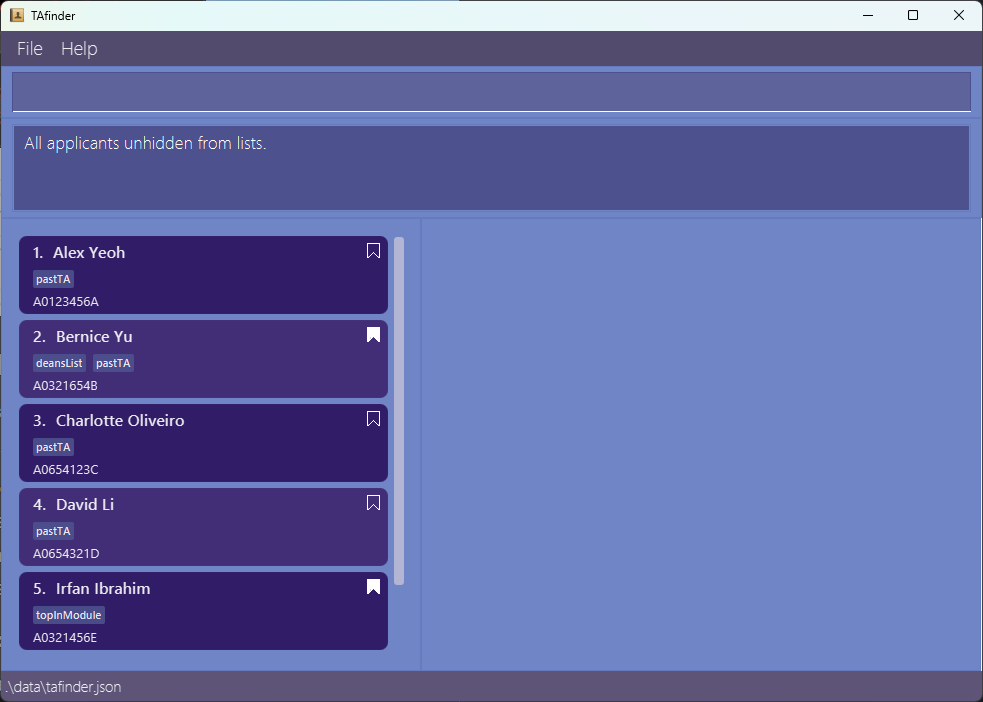
unhide-all
- Unhides all applicants that were previously hidden.
Examples:
hide 2
- Hides the applicant at index 2.
list hidden followed by unhide 2
- Lists all hidden applicants, then unhides the applicant at index 2 in the list of hidden applicants.
unhide-all
- Unhides all applicants.
Expected Outputs:
- Successfully hidden an applicant.
- Confirmation message:
Applicant <name>; Phone: <phone>; Email: <email>; GPA: <gpa>; Comment: <comment>; Tags: <tags> hidden from lists.
Erroneous Outputs:
Missing index:
Invalid command format!
hide: Hides an applicant, identified by the index number used in the last list, from all future lists of applicants.
Parameter: INDEX (must be a positive integer)
Example: hide 1
Index out of range:
Error: Invalid index. Please enter an index within range.
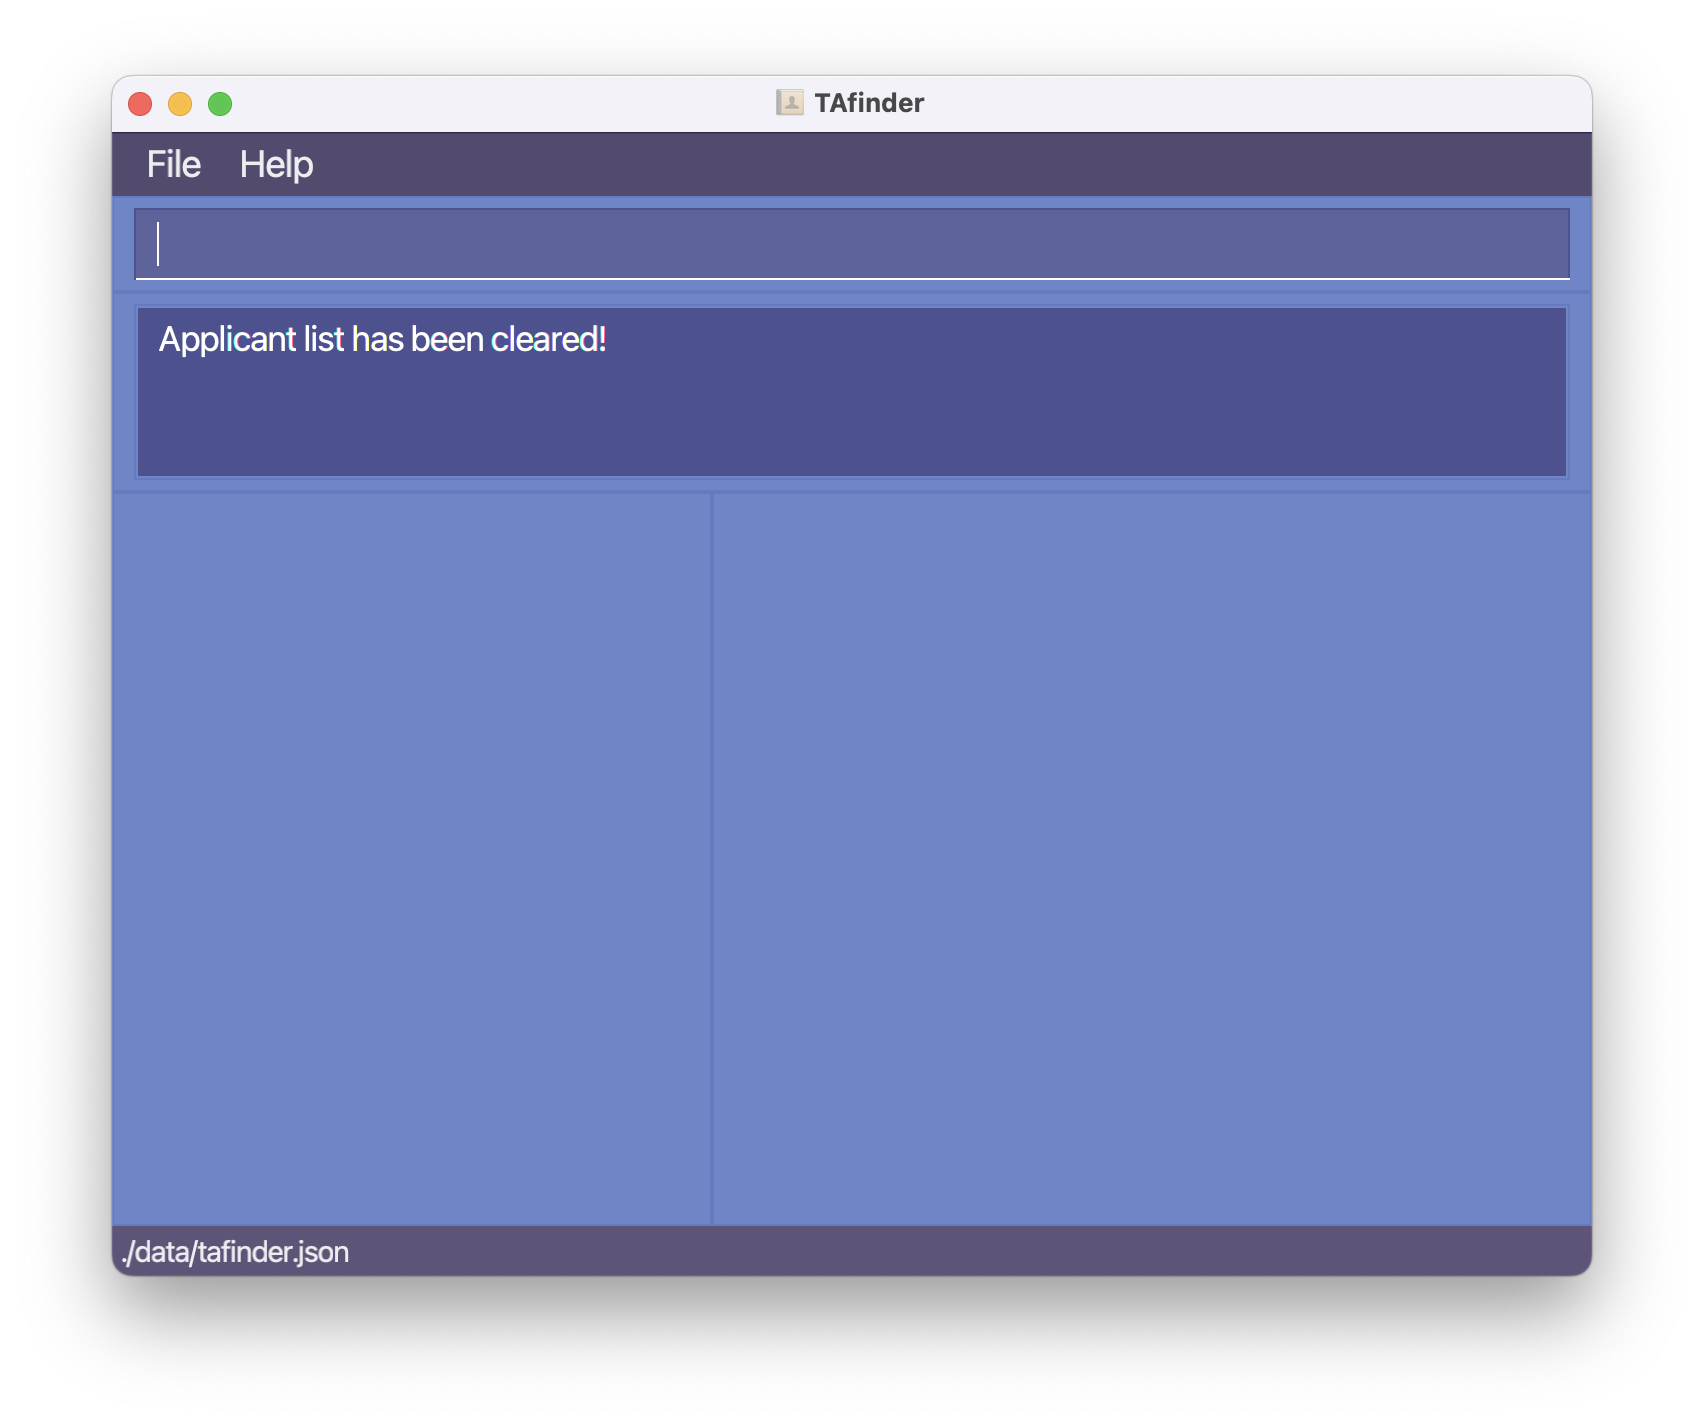
Clearing all applicants: clear
Clears your entire list of applicants.
Format:
clear
Following the example above, if you entered everything correctly, you should see the following:
| Before | After |
|---|---|
 |
 |
Expected Outputs:
- Successfully cleared all applicants.
- Confirmation message:
Applicant list has been cleared!
Exiting the application: exit
Exits the application, while ensuring all your changes are saved.
Format:
exit
Expected Outputs:
- Application closes.
Applicant evaluation & comparison
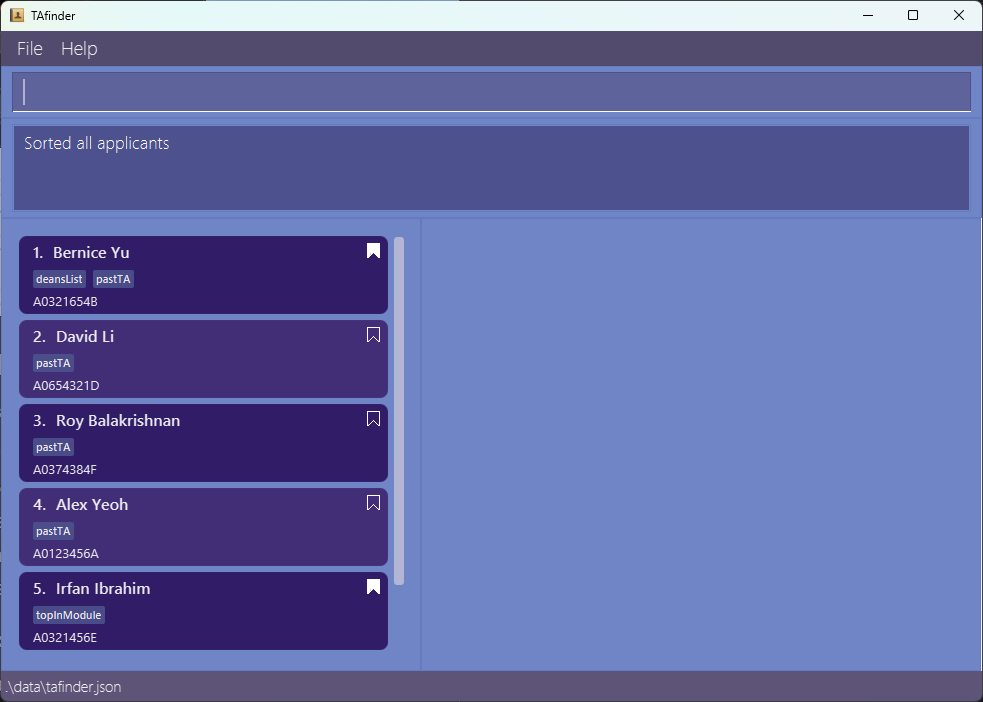
Sorting applicants by GPA: sort
Sorts applicants by a designated field.
| Before | After |
|---|---|
 |
|
Format:
sort FIELD
FIELD: The field that applicants are sorted by.
- Valid fields:
name,studentNo,gpa,previousGrade,interviewScore,comment,phone,email,tags
Expected Output:
- A sorted list of applicants.
Erroneous Outputs:
Empty list:
No applicants to sort.
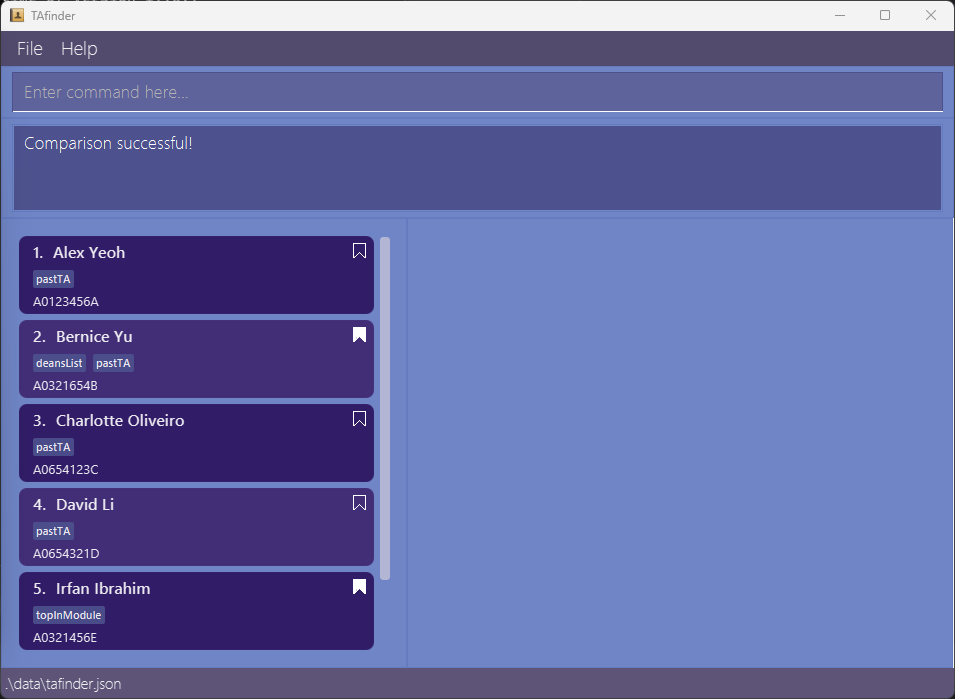
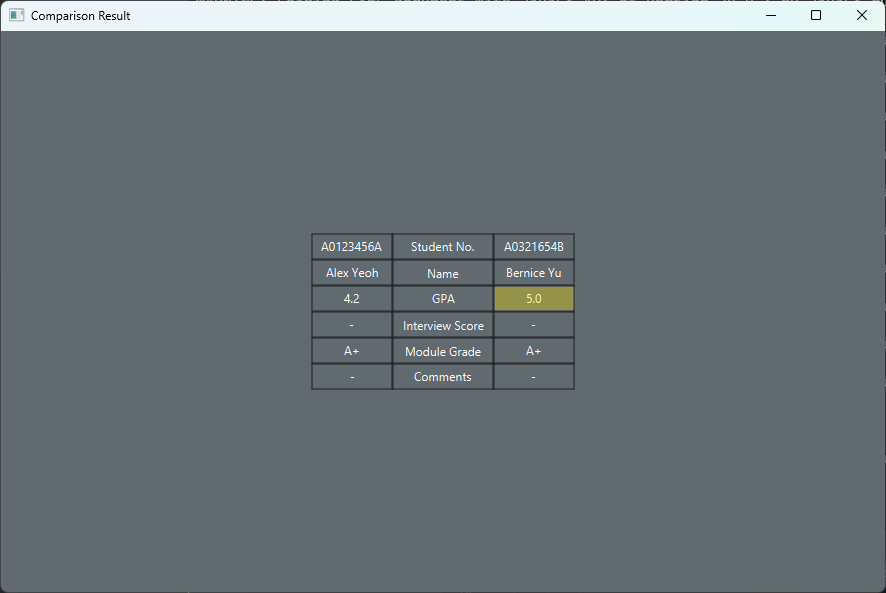
Comparing 2 applicants: compare
Compares two applicants side by side to make informed decisions.
| TAfinder window | Popup window |
|---|---|
 |
 |
Format:
compare INDEX1 INDEX2
INDEX1: The index of the first applicant to compare.
INDEX2: The index of the second applicant to compare.
Both indices must be a positive integer (e.g., 1, 2, 3…), and should not be the same.
Examples:
compare 1 2
- Compares the first and second applicants.
Expected Outputs:
- Successfully compare two applicants.
- Confirmation message:
Comparison successful! - A side-by-side comparison of the two applicants is displayed in a user-friendly format.
- This comparison window will include:
- Student number
- Name
- Various TA selection criteria such as:
- GPA
- Interview Score
- Module Grade
- Comments
- The system also highlights the differences between the two applicants, making it easy to see variations in their profiles.
Erroneous Outputs:
Applicant not found:
Error: One or both of the specified applicants were not found in the list.
Comparing the same applicant:
Error: Please provide distinct indices. You cannot compare the same applicant.
Comparing more than 2 applicants:
Invalid command format!
Please follow the format: compare INDEX1 INDEX2.
Parameters: INDEX (must be positive integers)
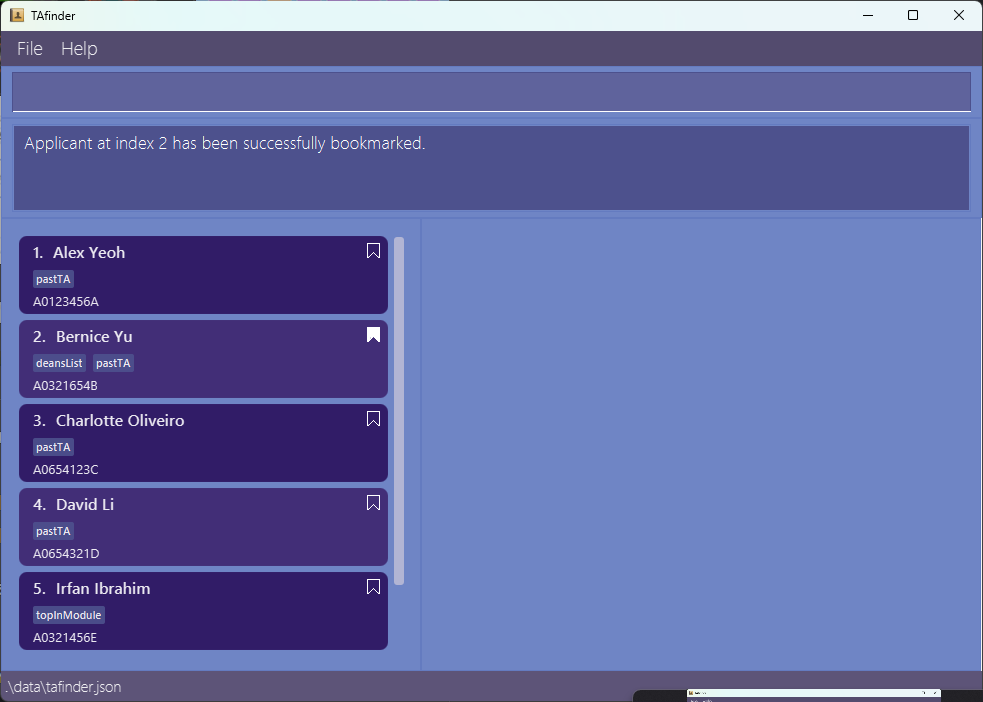
Bookmarking applicants: bookmark/unbookmark
Bookmarks/Unbookmarks a specific applicant.
Format:
bookmark INDEX / unbookmark INDEX
INDEX: The index corresponding to the applicant you want to bookmark/unbookmark. The index must be a positive integer (e.g., 1, 2, 3…).
Examples:
bookmark 2
- Bookmarks the second applicant.
Following the example above, if you entered everything correctly, you should see the following:
| Before | After |
|---|---|
 |
 |
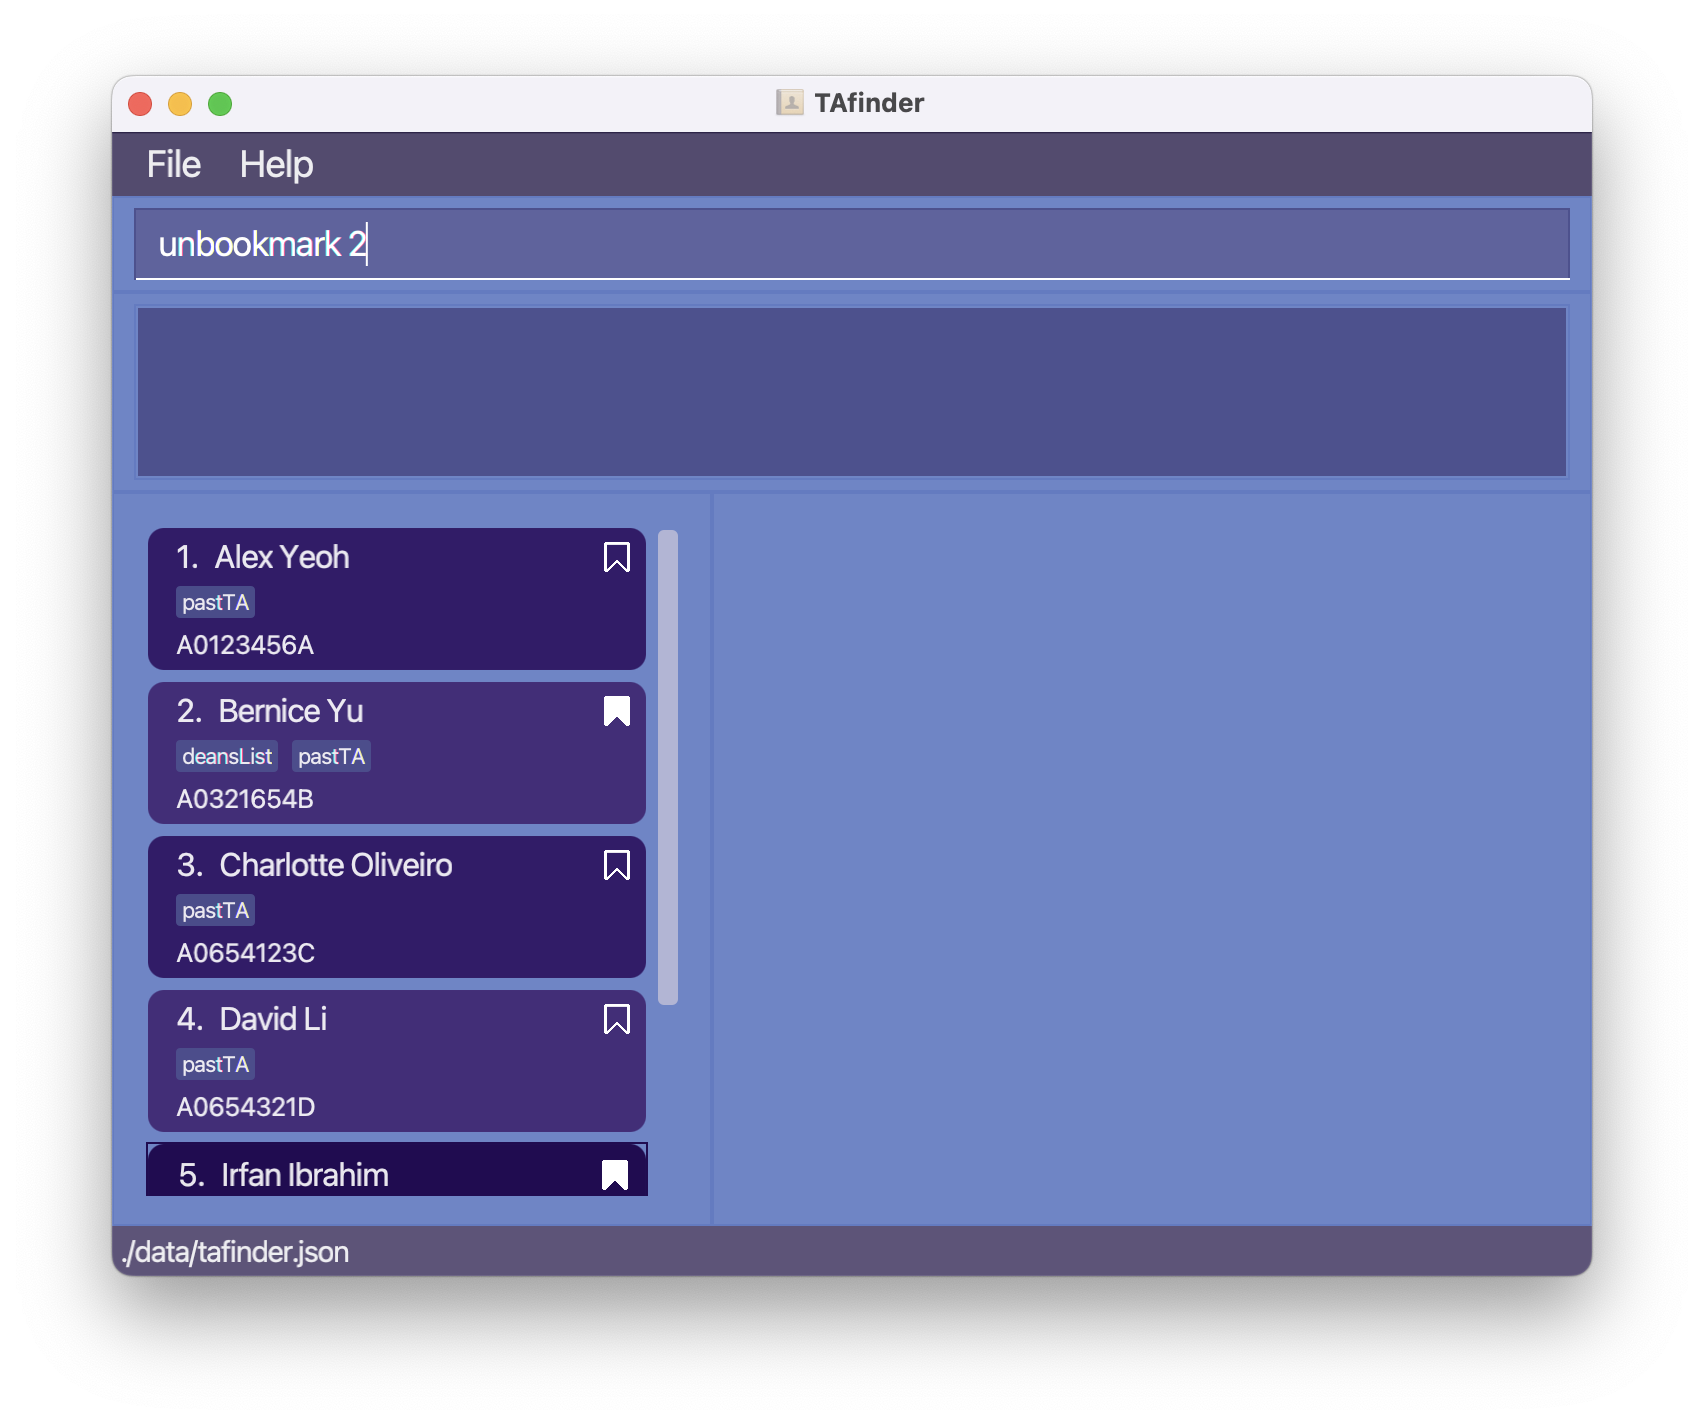
unbookmark 2
- Unbookmarks the second applicant.
Following the example above, if you entered everything correctly, you should see the following:
| Before | After |
|---|---|
 |
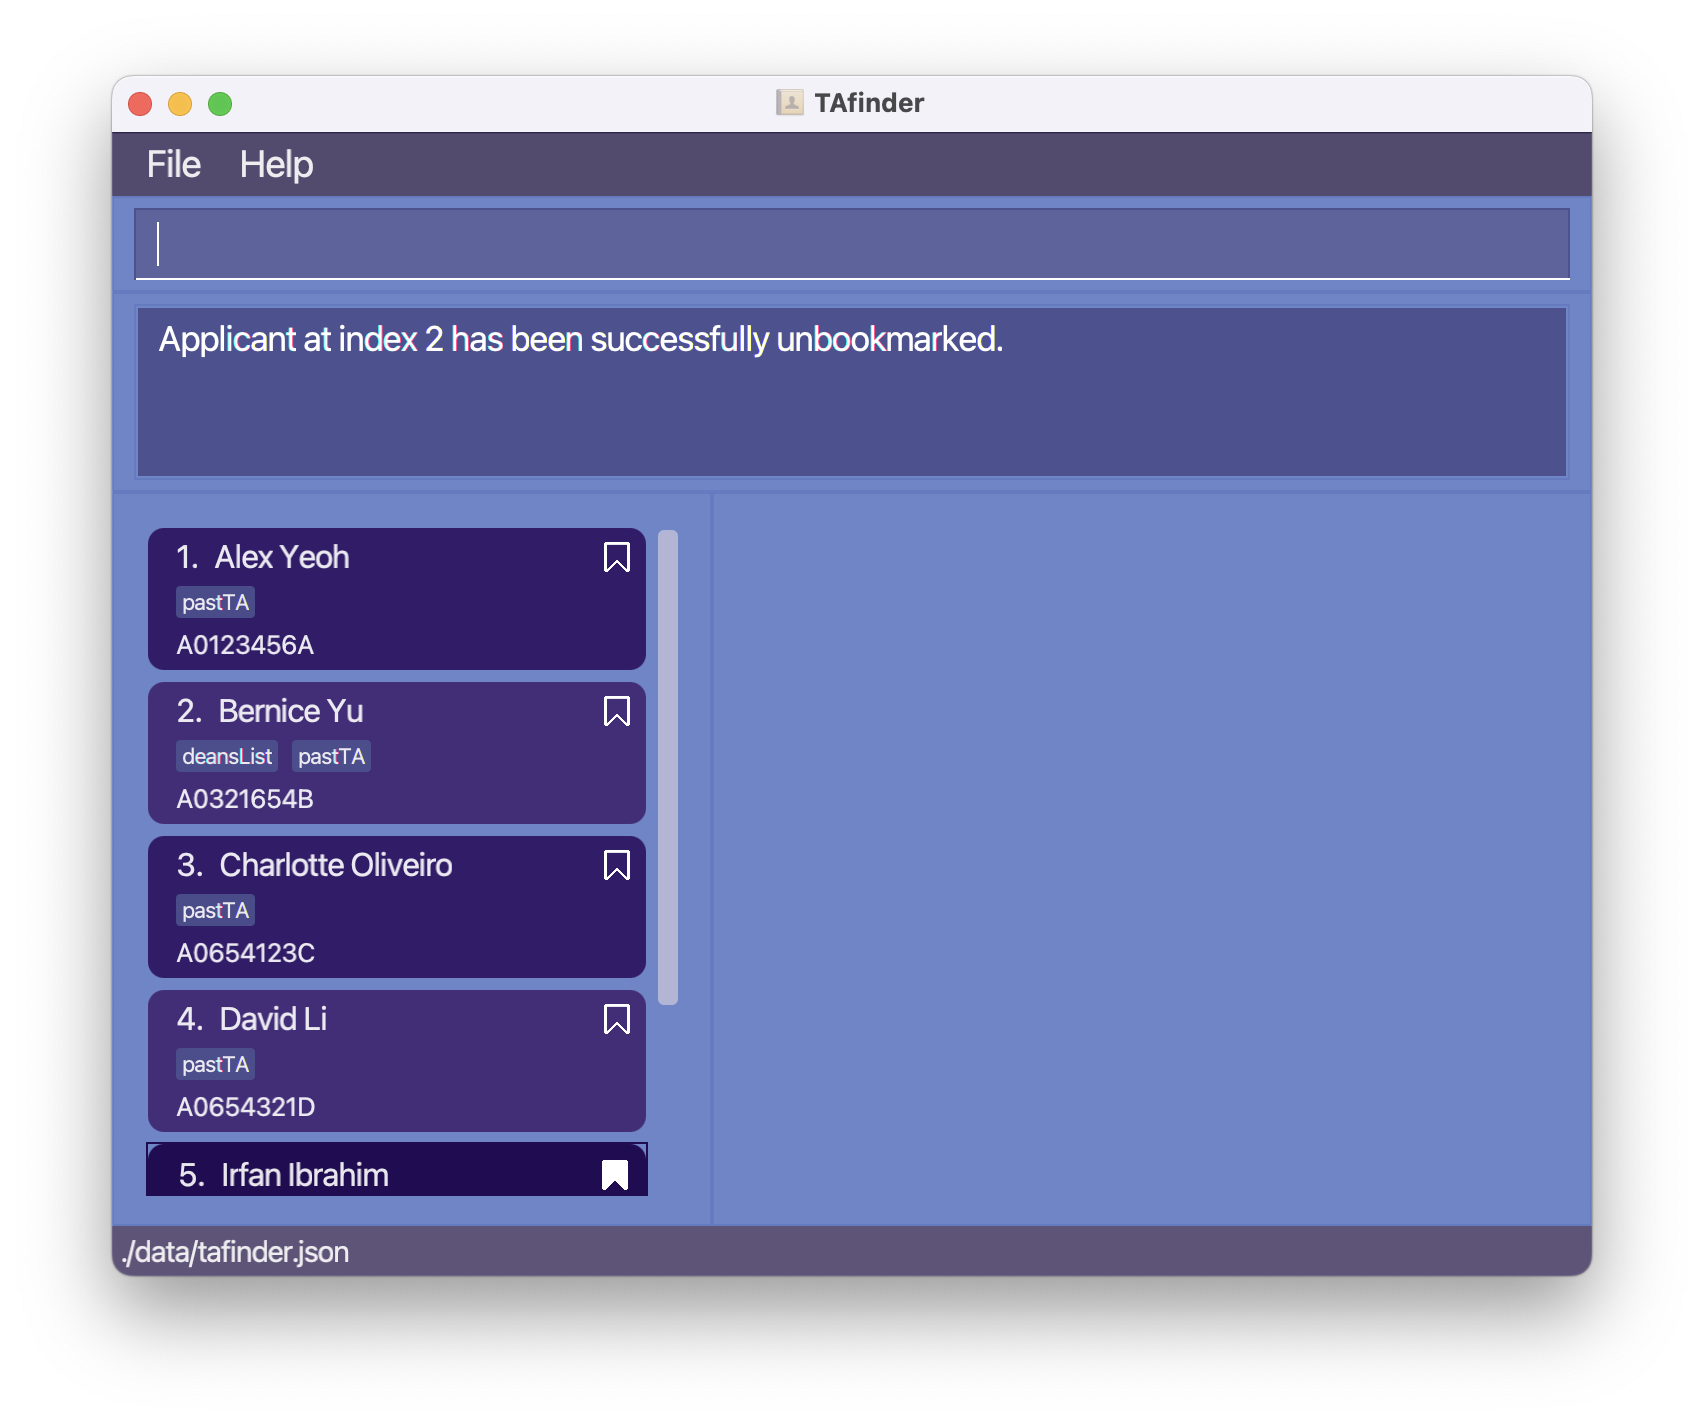 |
Expected Outputs:
- Successfully bookmarked/unbookmarked applicant at the given index.
- Confirmation message:
Applicant at index INDEX has been successfully bookmarked/unbookmarked.
Erroneous Outputs:
Missing index:
Invalid command format!
bookmark: Bookmarks an applicant, identified by the index number used in the last list, from all future lists of applicants.
Parameter: INDEX (must be a positive integer)
Example: bookmark 1
Index out of range:
Error: Invalid index. Please enter an index within range.
Commenting on applicant: comment
One of yours TAs is unable to make it for the interview. You want to make a comment on the applicant to remind yourself to follow up with him/her. Lets find out how to do use the comment feature to do so.
Format:
comment INDEX c/COMMENT
INDEX: The index corresponding to the applicant to be commented. The index must be a positive integer (e.g., 1, 2, 3…).
The index of the applicant is the number beside the applicant’s name in the list of applicants.
Example:
comment 3 c/Unable to make it for interview
- Comments on the third applicant with the comment: “Unable to make it for interview”
Following the example above, if you entered everything correctly, you should see the following:
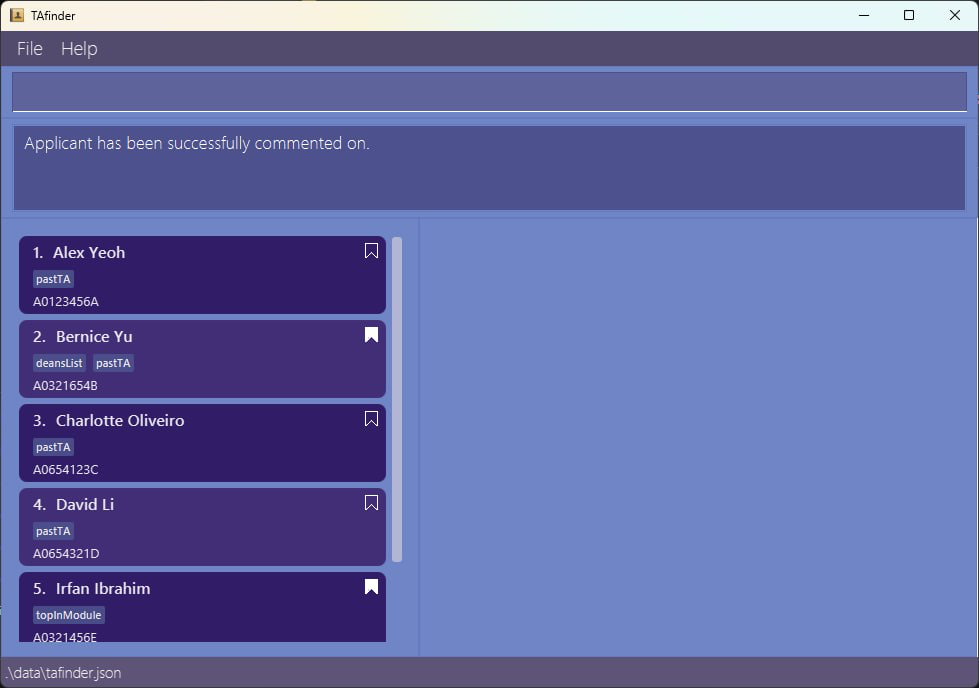
You have now successfully commented on the applicant. As you comment on more applicants in the list, watch out for the expected and erroneous messages below that could be displayed in the command result screen!
Expected Outputs:
- Successfully commented on the applicant at the given index.
- Confirmation message:
Applicant has been successfully commented on.
Erroneous Outputs:
Invalid command format:
Invalid command format!"
"comment: Edits the comment of the person identified by the index number used in the last person listing. Existing comment will be overwritten by the input."
"Parameters: INDEX (must be a positive integer) c/ [COMMENT]"
"Example: comment 1 c/ Hardworking student
Index out of range:
Error: Invalid index. Please enter an index within range.
Files and data management
Importing applicants from spreadsheet: import
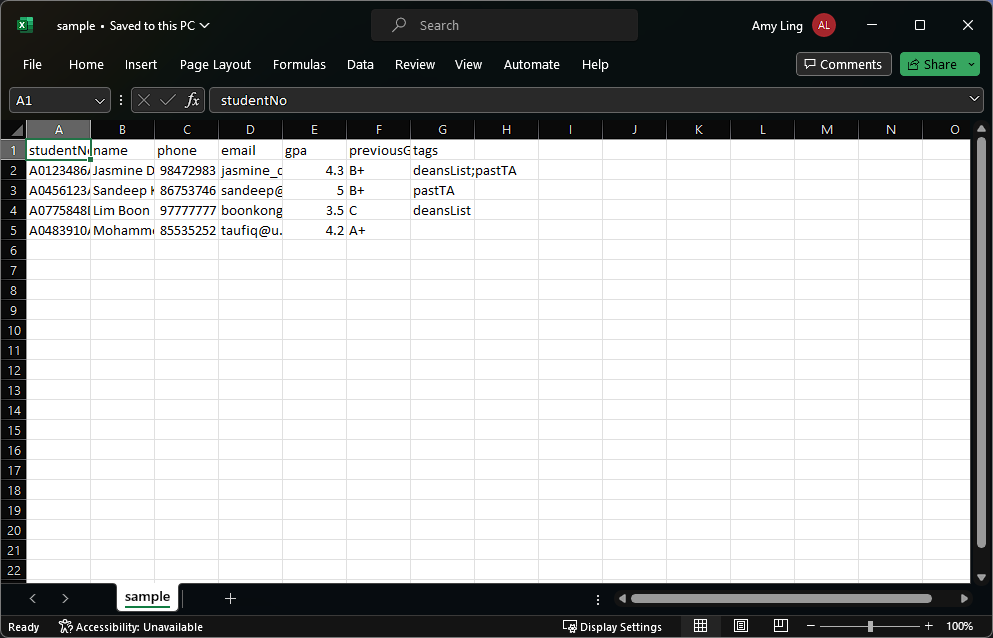
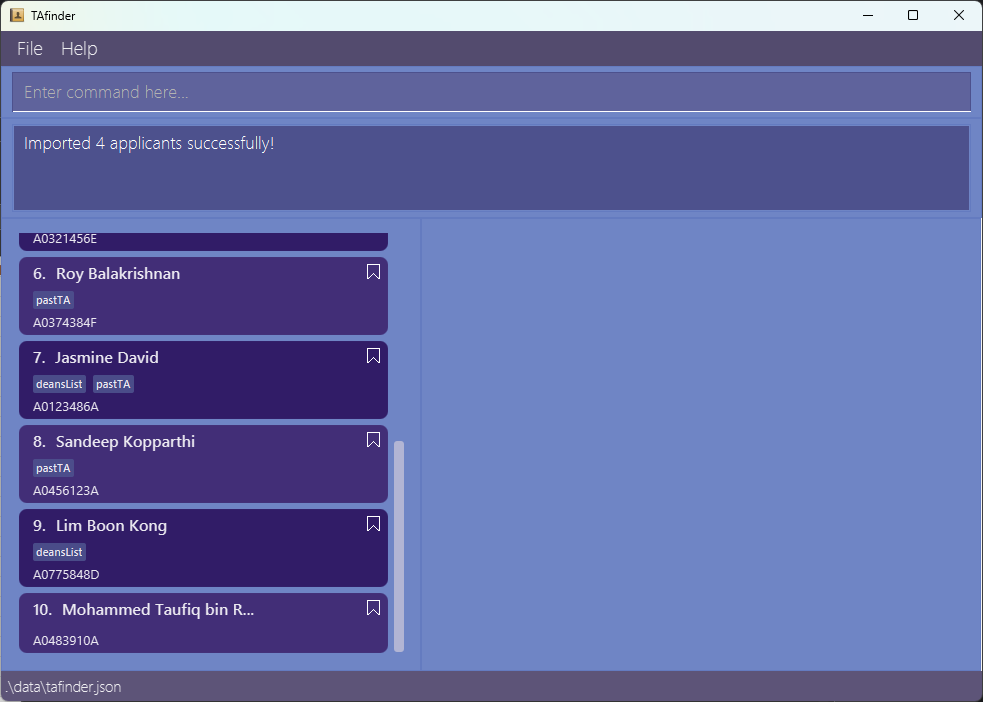
Imports an entire list of applicants along with their details from a CSV file. If applicants with the same student number already exist, they will be skipped.
| Sample .csv | After import |
|---|---|
 |
 |
Format:
import FILENAME
FILENAME: The desired filename of the CSV file to import from (including the file extension).
The first line of the CSV file should contain the column names e.g. studentNo, name in any order. It must contain all the column names as specified in the example below. The following rows should contain the data for each applicant in the order specified by the header row.
studentNo,name,phone,email,gpa,previousGrade,tags
A0123486A,Jasmine David,98472983,jasmine_david@u.nus.edu,4.3,B+,deansList;pastTA
A0456123A,Sandeep Kopparthi,86753746,sandeep@u.nus.edu,5.0,B+,pastTA
A0775848D,Lim Boon Kong,97777777,boonkong@u.nus.edu,3.5,C,deansList
A0483910A,Mohammed Taufiq bin Rozaini,85535252,taufiq@u.nus.edu,4.2,A+,
Note: The CSV format supported is only a subset of the RFC 4180 CSV standard. Only text, commas and newlines are respected. No quoting or escaping is recognised by the parser.
Examples:
import ta-applicants.csv
- Imports a entire list of applicants, from a file in the CSV format called
ta-applicants.csvin the same directory as the JAR file, into TAfinder.
Expected Output:
- Successfully attached a file to the applicant at the corresponding index.
- Confirmation message:
Importediapplicants successfully!
Erroneous Outputs:
Missing file permissions or invalid file path:
Failed to open and load applicant file.
Attaching file to applicant profiles: attach
Attaches local files to the profiles of applicants to provide even more richness and insight into their applications.

Format:
attach INDEX f/FILEPATH
INDEX: The index of the applicant to edit. The index must be a positive integer (e.g., 1, 2, 3…).
FILEPATH: The desired path of the file to attach to the applicant’s profile. This is relative to the path of the JAR file unless either / or C:\ is at the start of the path, then the path will be treated as an absolute path.
Examples:
attach 2 f/john-resume.pdf
- Attaches the file called
john-resume.pdfin the same directory as thetafinder.jarfile to the second applicant in the applicant list.
attach 78 f//home/jennifer/resumes/benson-resume.pdf
- Attaches the file called
benson-resume.pdfin the directory/home/jennifer/resumesto the 78th applicant in the applicant list.
Expected Outputs:
- Successfully attached a file to the applicant at the corresponding index.
- Confirmation message:
Attachediattachments toname!
Erroneous Outputs:
Invalid file path or corrupted data:
Failed to copy attachment.
Any other unexpected error:
Error: Unknown error. Please contact the app developer at contact@email.com
Data Management
Saving the data
TAfinder data is saved in the hard disk automatically after any command that changes the data. There is no need to save manually.
Editing the data file
TAfinder data is saved automatically as a JSON file [JAR file location]/data/tafinder.json. Advanced users are welcome to update data directly by editing that data file.
Warning!:
If your changes to the data file makes its format invalid, TAfinder will discard all data and start with an empty data file at the next run. Hence, it is recommended to take a backup of the file before editing it.
FAQ
Q: How do I transfer my data to another Computer?
A: Install the app in the other computer and overwrite the empty data file it creates with the file that contains the data of your previous AddressBook home folder.
Known Issues
-
When using multiple screens, if you move the application to a secondary screen, and later switch to using only the primary screen, the GUI will open off-screen. The remedy is to delete the
preferences.jsonfile created by the application before running the application again.
Summary
Prefix Summary
| Parameter | Prefix | Rules |
|---|---|---|
| Student Number | s/ | - Should be in the format CdddddddC, where d represents digit and C represents capital letters. |
| Name | n/ | - Should only contain alphanumeric characters and spaces. |
| Phone | p/ | - Should only contain digits. - Should have at least 3 digits. |
| e/ | - Should only be of the form local@domain and only accept alphanumeric characters.- local allows for special characters +, _, . and - as well.- domain must be at least 2 letters long. |
|
| GPA | g/ | - Should be in the range of 0.00 to 5.00 inclusive. - Can be given in 0, 1 or 2 decimal places. |
| Previous Grade | pg/ | - Should be one of the following: A+, A, A-, B+, B, B-, C+, C, D+, D, F. |
| Interview Score | is/ | - Should be in the range of 0.00 to 10.00 inclusive. - Can be given in 0, 1 or 2 decimal places. |
| Comment | c/ | - No restrictions. |
| Tag | t/ | - Should only contain alphanumeric characters. - Should not contain spaces. |
Command Summary
Basic applicant management
| Action | Format, Examples |
|---|---|
| Add | - add s/STUDENT_NUMBER n/NAME p/PHONE e/EMAIL g/GPA pg/PREVIOUS_GRADE [is/INTERVIEW_SCORE] [c/COMMENT] [t/TAG]… - e.g., add s/A0269357C n/john doe p/91234567 e/johndoe@example.com g/5.0 pg/A+ t/pastTA t/deanslist
|
| Edit | - edit INDEX [n/NAME] [p/PHONE_NUMBER] [e/EMAIL] [a/ADDRESS] [t/TAG]…- e.g., edit 2 n/James Lee e/jameslee@example.com
|
| Delete | - delete INDEX- e.g., delete 3
|
| List | - list [FIELD]
|
| View | - view INDEX- e.g., view 3
|
| Hide/Unhide | - hide INDEX / unhide INDEX- e.g., hide 3 / unhide 3
|
Applicant comparison and evaluation
| Action | Format, Examples |
|---|---|
| Sort | - sort FIELD- e.g., sort gpa, sort name
|
| Compare | - compare INDEX1 INDEX2- e.g., compare 1 2
|
| Bookmark/Unbookmark | - bookmark INDEX / unbookmark INDEX- e.g., bookmark 3 / unbookmark 3
|
| Comment | - comment INDEX c/COMMENT- e.g., comment 3 c/Hardworking
|
Data import and management
| Action | Format, Examples |
|---|---|
| Import | - import FILENAME- e.g., import ta-applicants.csv
|
| Attach | - attach INDEX FILEPATH- e.g., attach 2 john-resume.pdf
|